Intro To Visual Studio & Audio Programming - Part 1
Table of Contents
Introduction
I learned about compiling C/C++ programs in class using gcc, g++, just like a lot of people. It wasn't until I started programming in CUDA that I started using Visual Studio. I'm trying to move my builds to CMake to make it less platform dependent, but Visual Studio is a great Windows IDE for C/C++ debugging. It can be very bulky and it takes up a lot of space, but the tools are insanely helpful for in-depth debugging and for large-scale projects. I was reading this blog post recently about C++, and the top three are CLion, XCode, and Visual Studio. If you're on a Windows machine, then you're stuck with Visual Studio or CLion. On another note, I am a huge fan of Microsoft's Visual Studio Code - which is not an IDE. It's technically a text editor, but it has so many features and extensions that it can feel like an IDE. In fact, sometimes I will write code in VSCode and only compile/debug in VS. For smaller projects, especially on Linux, I will use VSCode for everything.
So the point of this post is to get you up to speed with C++ audio programming in Visual Studio. All of the source code posted in this tutorial can be found on GitHub. So let's go!
Installation
You can get the latest version of Visual Studio here. The community edition is free. When it prompts you to pick the developer bundles, pick what you want. The only one that's required for this guide is "Desktop Development with C++". I also have ".NET desktop development" for C# Intellisense, "Game development with Unity" for VS support inside Unity, and "Linux development with C++" for Windows Subsystem for Linux (WSL) support -- that I admittedly haven't used yet.
Fair warning - this will take a long time to install, and you will have to restart your computer.
Hello World!
Okay now that installation is over, you're ready to code! Open up Visual Studio 2019, and you should see this start screen. Let's create a new project.
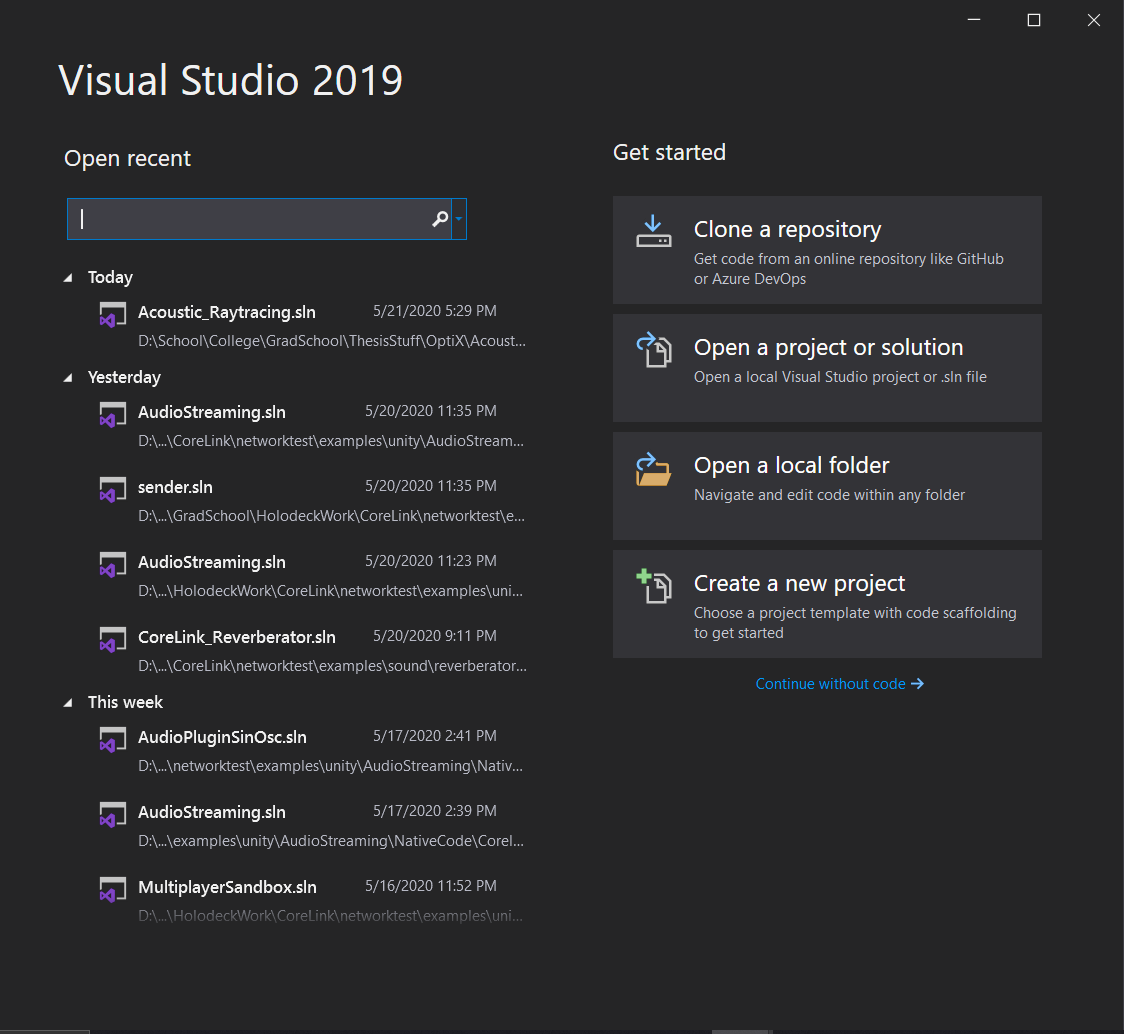
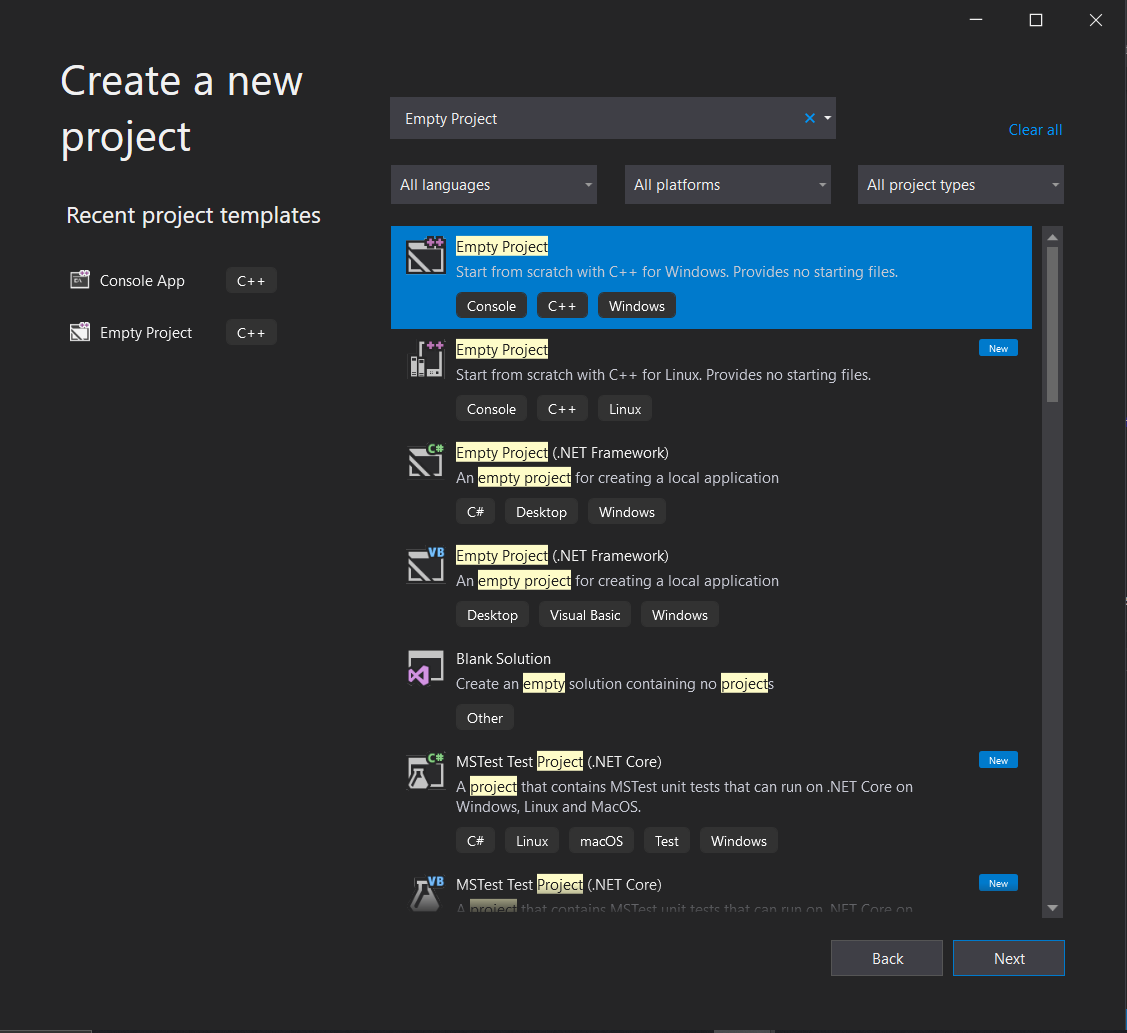
When you create a new project, you can choose between "Console App" or "Empty Project".
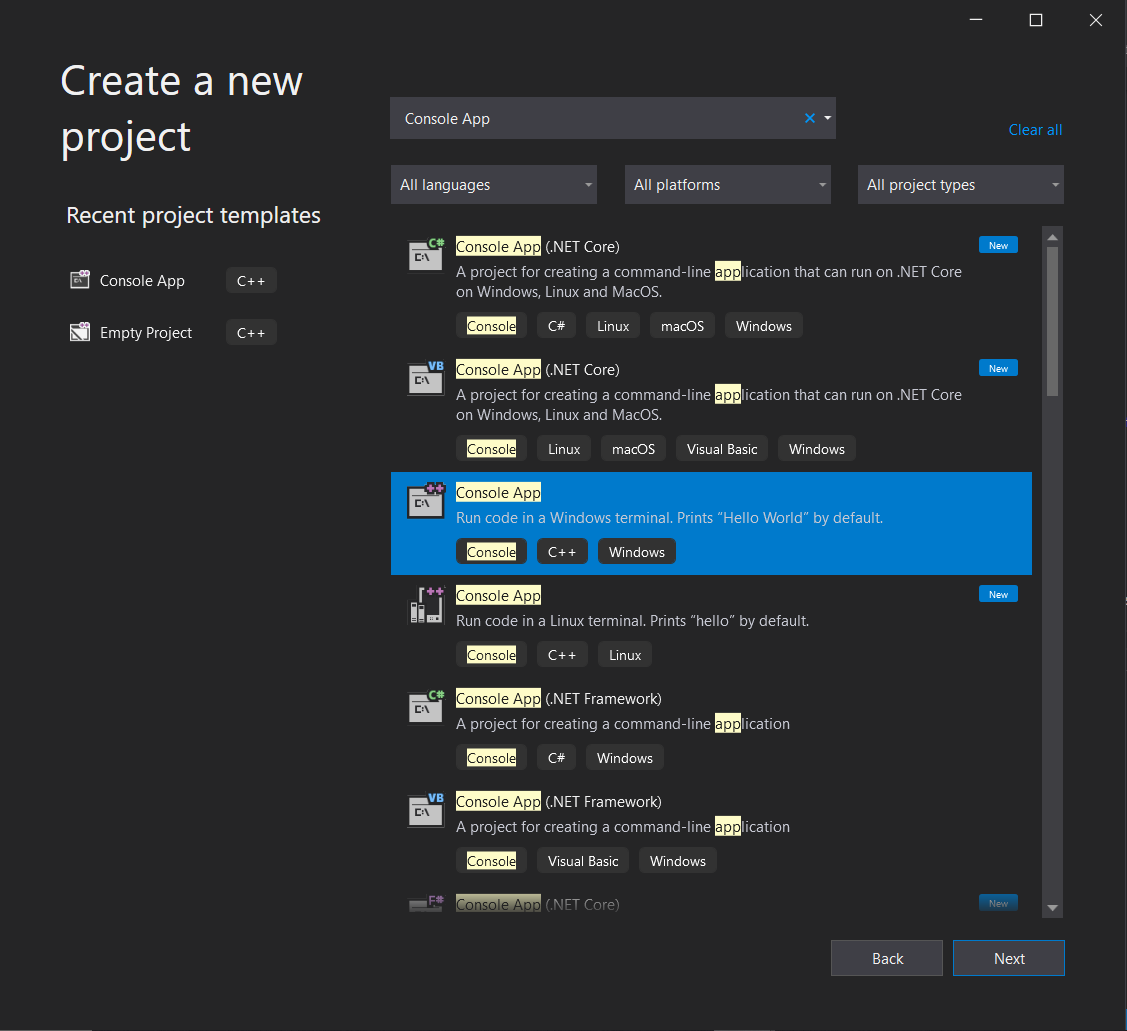
I used to use "Console App" until I realized I was just deleting the files in that template anyways, so now I use "Empty Project." This assumes that I'm not doing any CUDA programming. There is a separate template for CUDA programming, but recently that is incompatible with VS2019 and CUDA 10, so there's a separate workaround for that, and I'll touch on that later.
After you hit next, you'll be asked where to put your new project.
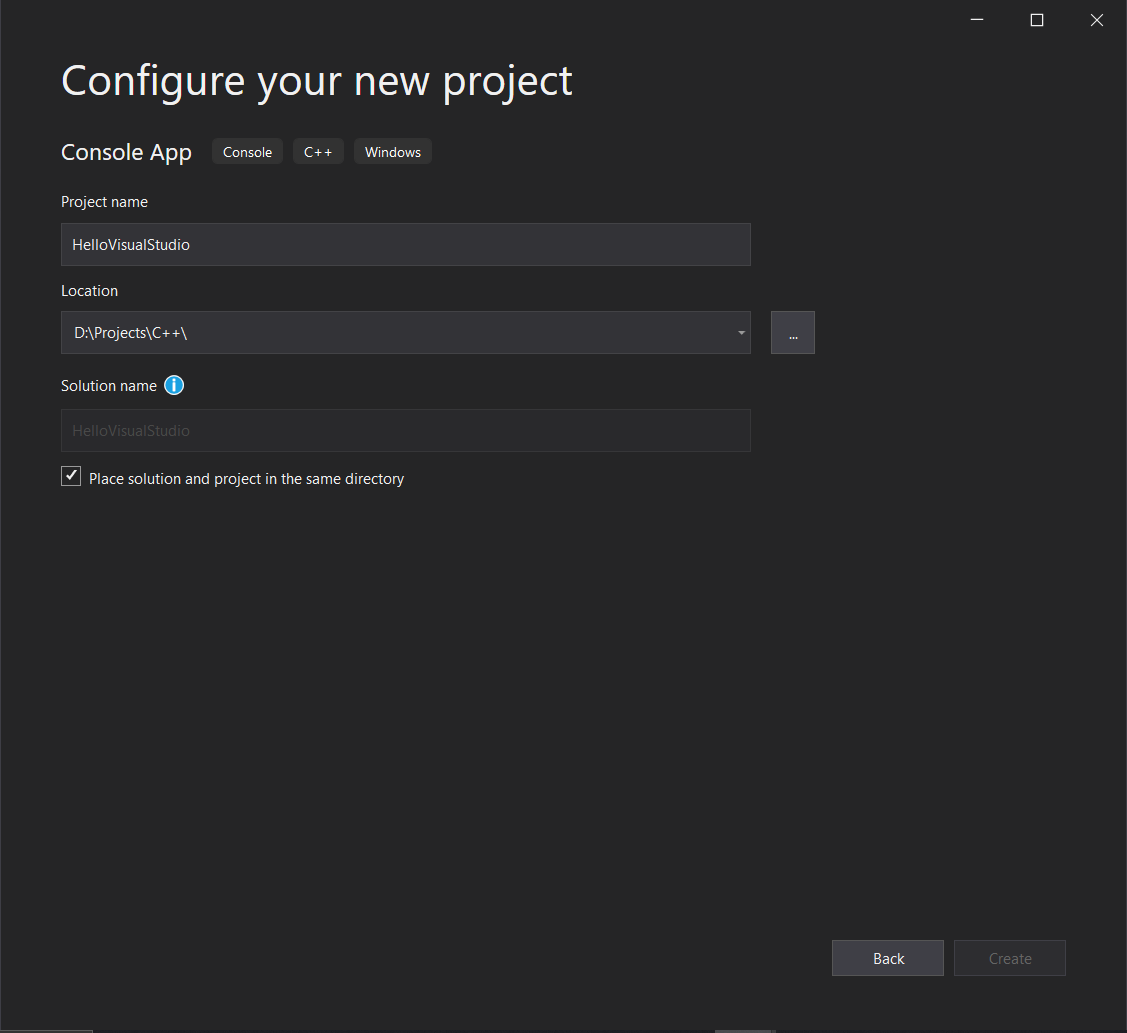
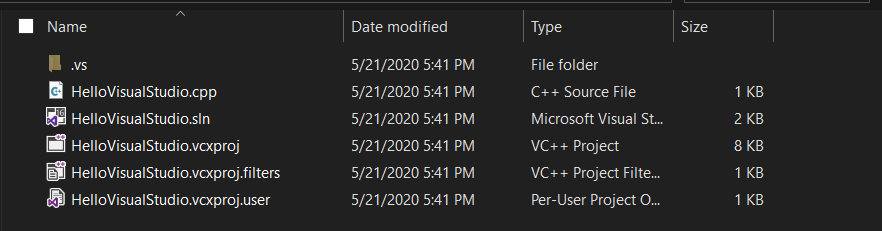
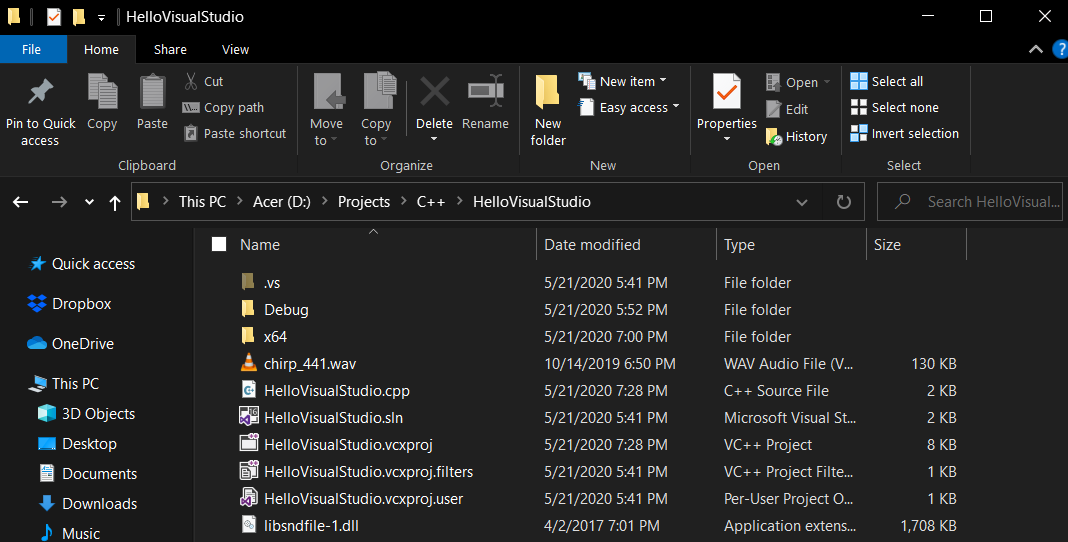
There are two types of files that VS uses, solutions and projects with their respective
.sln and .vxproj extensions. There are also .filter and
.user files, but those are optional and are only used to filter the code in the IDE.
Here is what our new project looks like inside file explorer.
Then if you look inside the IDE, it will look something like this
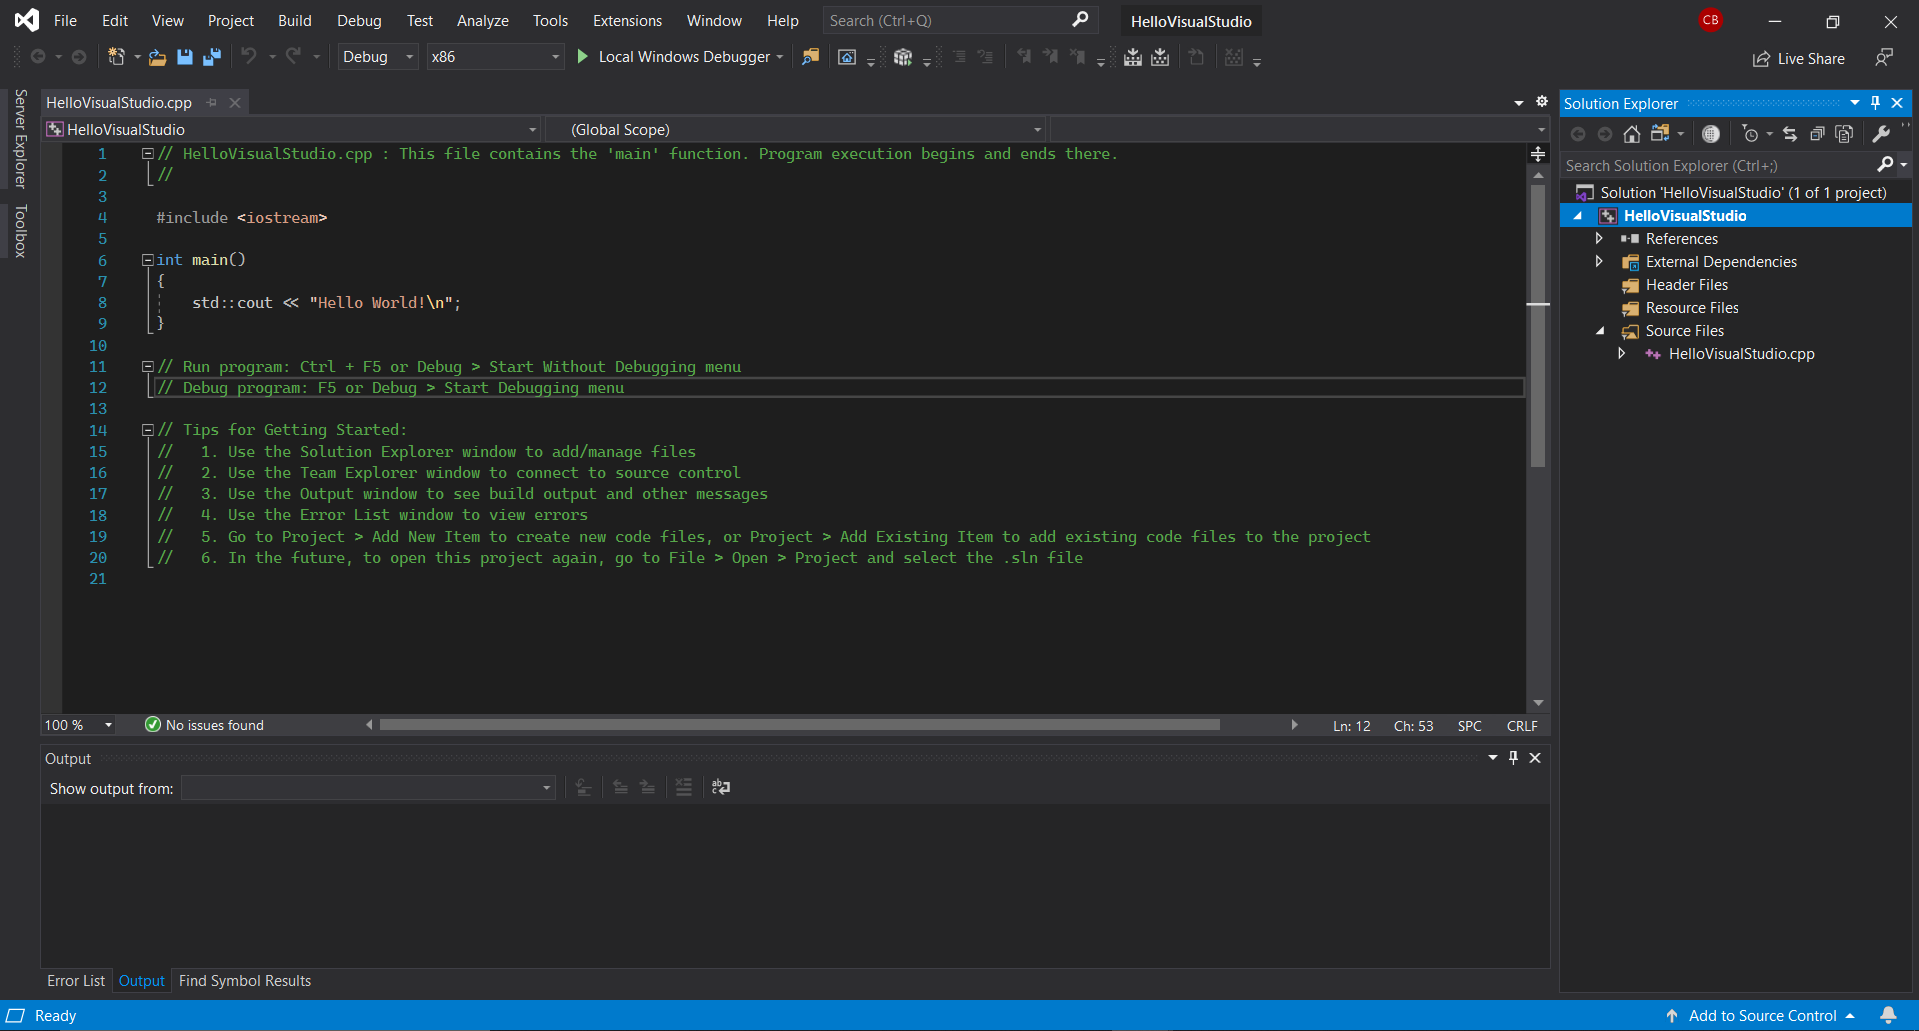
The "Solution Explorer" pane is the most frequent pane that I use. If you don't see that, you can activate it under View --> Solution Explorer or through the shortcut Ctrl + Shift + E. You can change your color scheme to dark under Tools -> Options (Ctrl + ,) --> General. You can also change the keybinds to match VSCode under Keyboard (below General). Personally, I used VSCode extensively before VS, so the native VS shortcuts screw me up.
Now if you hit F5 or the play button, you should see this:
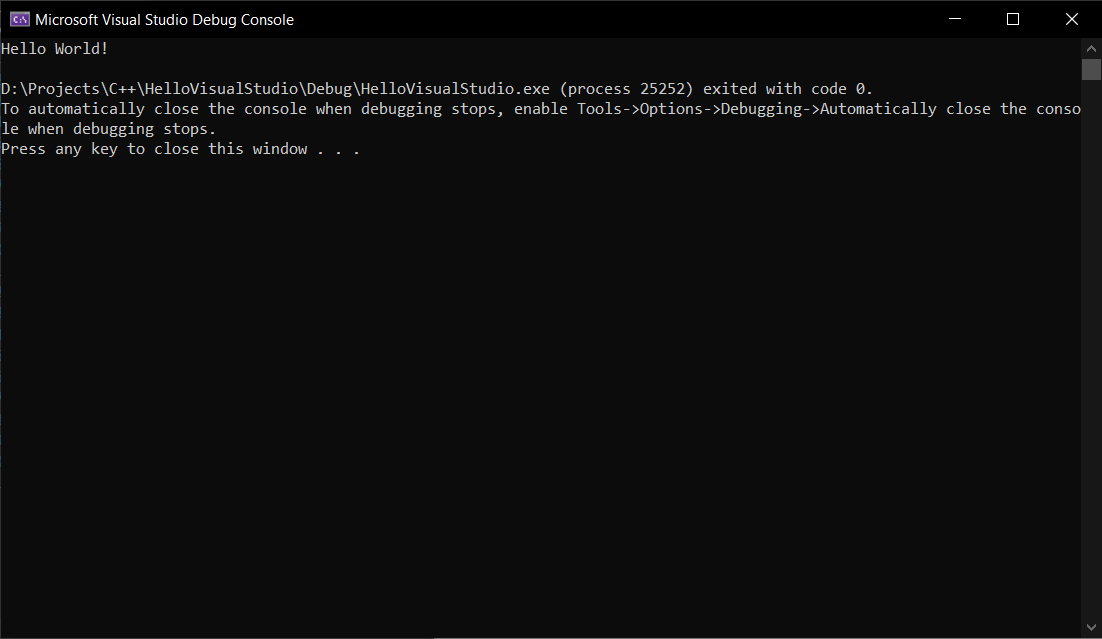
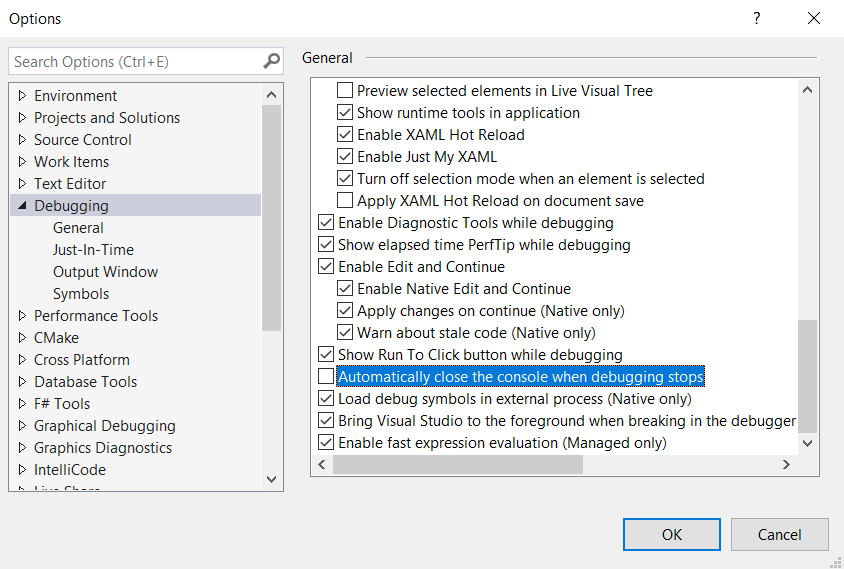
If the console window does not persist, then follow the instructions and uncheck this option
Great! You have your hello world program in Visual Studio!
Adding libsndfile
Introduction
The first step to audio processing is to read in wave files and operate on them. The nice part about libsndfile is that it has a windows installer executable, so we don't have to compile anything from source. Here is the download link. The author, Erik de Castro Lopo is an amazing C audio programmer, and he's the one who wrote libsndfile, SRC, and several other essential libraries. He also has an introduction to Audio DSP tutorial from 2002 on his website.
Installation
After you download the MSI file and install it, it will write the files to
C:\Program Files\Mega-Nerd\libsndfile if you chose the 64 bit version or
C:\Program Files (x86)\Mega-Nerd\libsndfile if you chose the 32 bit version. As implied
by the name, you can only compile 64 bit projects with the 64 bit version and you can only compile
32 bit projects with the 32 bit version.

If you go into the bin folder, you should be able to double click on any of the
executables and it will do something. For some of them, it most likely make a terminal pop up and
immediately disappear. You can alleviate that by opening up a Powershell (PS) or command prompt
(cmd), drag the executable into the command prompt, and hit enter. If those don't work, then
something went wrong in the installation and you'll have to figure that out before proceeding.
If you're new to C++ programming, then the important files in this installation are the library
files and the include files. The library files need to be read by the linker or loaded at run time.
The include files are .h/.hh files that you need to reference in your code. The
bin folder contains the dynamically linked library, the lib folder
contains the statically linked library, and the include folder contains the include
headers. This is standard for any C/C++ library. In Linux, the libraries will be .so
files. This installation is a very good representation of what a normal C/C++ library installation
looks like.
Demo Source Code
For my demo, I want to read in a file, decrease the volume by 6 dB, and write it as a separate file.
I have an example wave file that I copied into the same folder as the .sln file called
chirp_441.wav. I'm also going to use the C++ wrapper of libsndfile instead of the C way of doing it.
This is what my source code looks like.
#include <iostream>
#include <sndfile.hh>

int main()
{
	std::cout << "Specify our file strings" << std::endl;
	std::string input_file = "chirp_441.wav";
	std::string output_file = "output.wav";

	std::cout << "Instantiate the soundfile object and open the file" << std::endl;
	SndfileHandle ifile = SndfileHandle(input_file);

	std::cout << "Create array to store our audio" << std::endl;
	float* input_buf = new float[ifile.frames() * ifile.channels()];

	std::cout << "Read the file into the array" << std::endl;
	ifile.readf(input_buf, ifile.frames());

	std::cout << "Dividing each sample by 2, or decreasing by 6 dB" << std::endl;
	for (int i = 0; i < ifile.frames() * ifile.channels(); i++) {
		input_buf[i] /= 2.0;
	}

	std::cout << "Open output file" << std::endl;
	SndfileHandle ofile = SndfileHandle(output_file, SFM_WRITE, SF_FORMAT_WAV | SF_FORMAT_PCM_24, ifile.channels(), ifile.samplerate());

	std::cout << "Write to output. For this example, no error checking." << std::endl;
	size_t count = ofile.write(input_buf, ifile.frames());

	std::cout << "Delete our allocated memory" << std::endl;
	delete[] input_buf;
}
Include Files
In your code, you have to have
#include <sndfile.hh>sndfile.h. The C++ wrapper is
sndfile.hh. However, if you did this right off the bat, Visual Studio doesn't know where to
look for it, and it will appear as an error. You have to customize your VS project to point to the
proper include file. This is essentially the equivalent of
gcc -I/path/to/include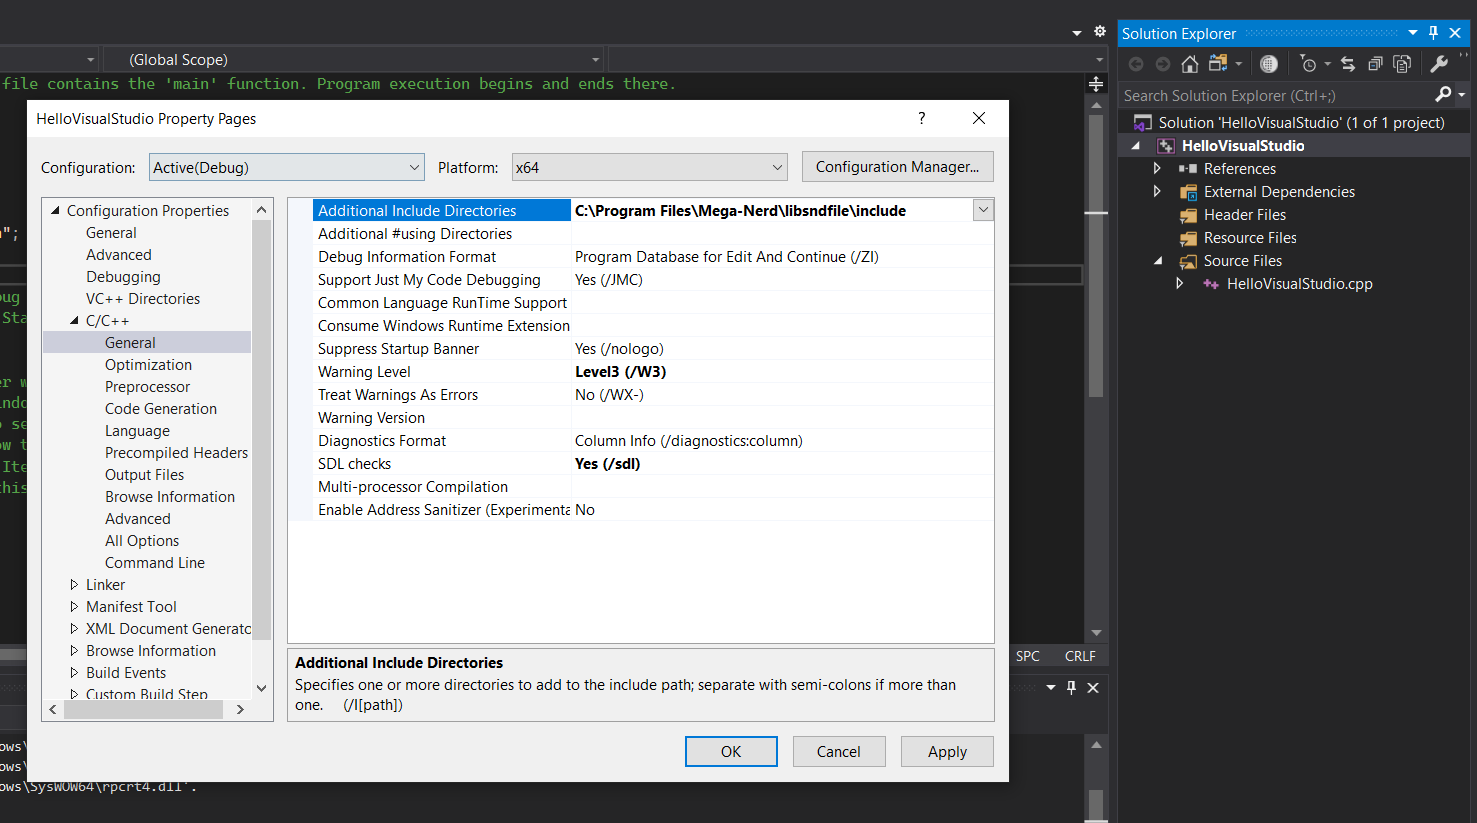
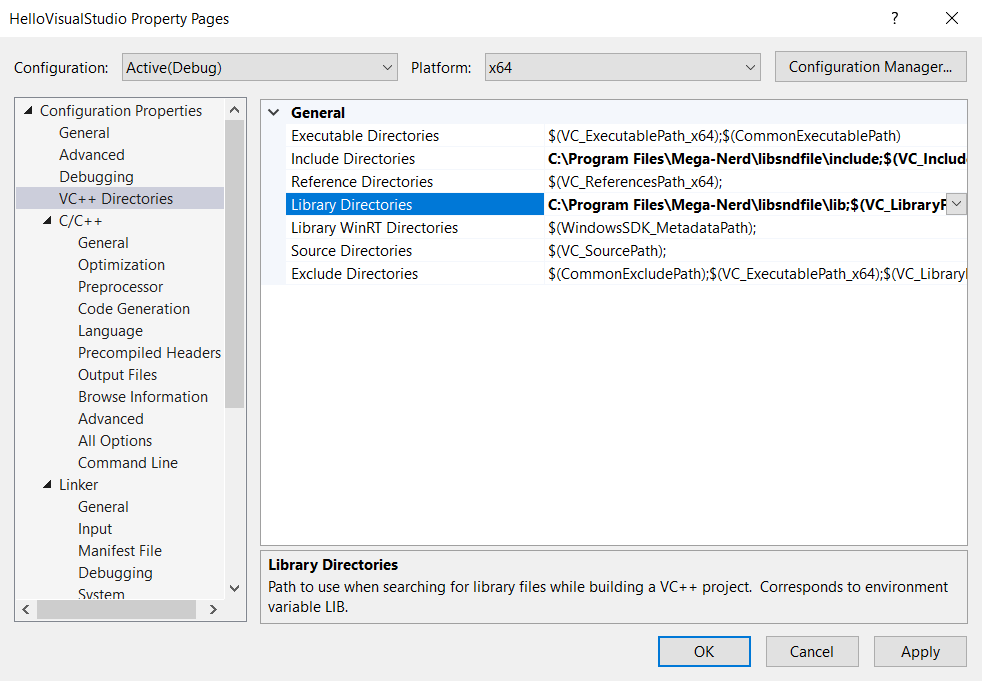
The second location is Configuration Properties --> VC++ Directories --> General --> Include
Directories.

Copy the include directory into one of those locations. I've seen that CMake will populate the first
option since it directly uses the /I flag in the VS compiler, but I am used to doing
the second option since I can include library/executable files in the
same location.
Now Intellisense won't yell at you that you have bad include file! Except, you get linker errors if you try to build it with any libsndfile function calls since it can't find the functions.
Importing Libs
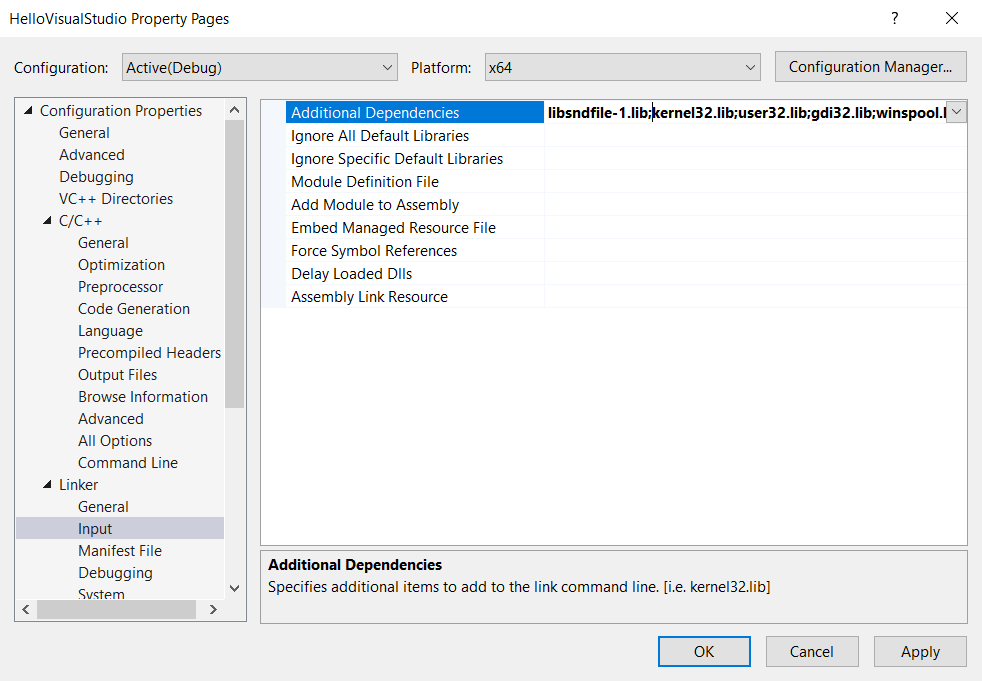
The next step is to import the statically linked library, which is the
lib/lbsndfile-1.lib file. You have to tell VS what file you want to include in the
linking process and where that file is. Go into the Property Pages --> Configuration Properties
--> Linker --> Input --> Additional Dependencies and add libsndfile-1.lib in the
beginning.
Then go into Property Pages --> Configuration Properties --> VC++ Directories and add the location
of the lib file.
So now our code will build successfully! However, if you try to run it, you will get an error that
it can't find libsndfile-1.dll.
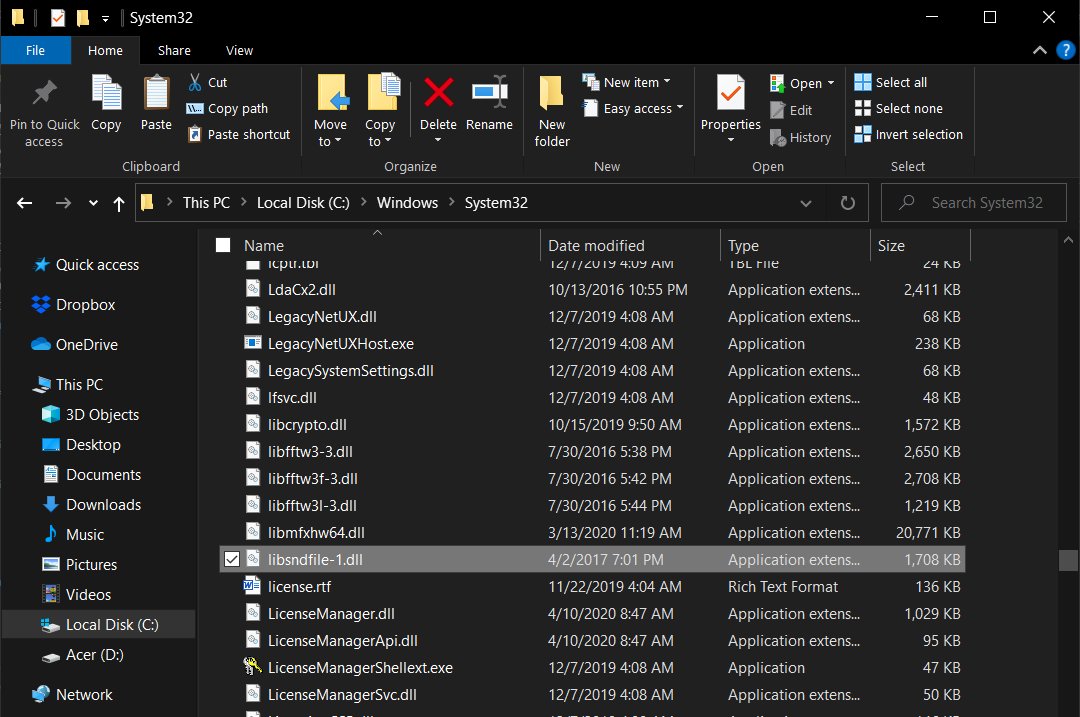
Importing DLLs
DLLs are called upon in runtime, as opposed to compile time or link time. In Windows, DLL
(Dynamically Linked Library) files are a bit tricky to import. The DLL file for
libsndfile is at bin/libsndfile-1.dll. There are several ways of trying to import these
in the code or getting very nitty gritty into the solution configuration, but I use two ways of
importing DLLs.
The first way is the "set it and forget it" way of importing DLLs. Copy the DLL it into
C:\Windows\System32. This requires administrative privileges, which you should have
since installing libsndfile in the first place required administrative privileges. This is also a
very "Linux" way of doing it.
The second way is to place it in your current working directory, at
the same level as the .sln file, however you have to repeat this for every single
project.
Yay! We have working code that uses libsndfile!
Creating a New VS Project
Right now we have one source file that contains the libsdnfile example. What if we wanted to keep
the Hello World program we wrote initially? If both source files were in the same project, then we
will run into an issue because Visual Studio only allows one main function per project.
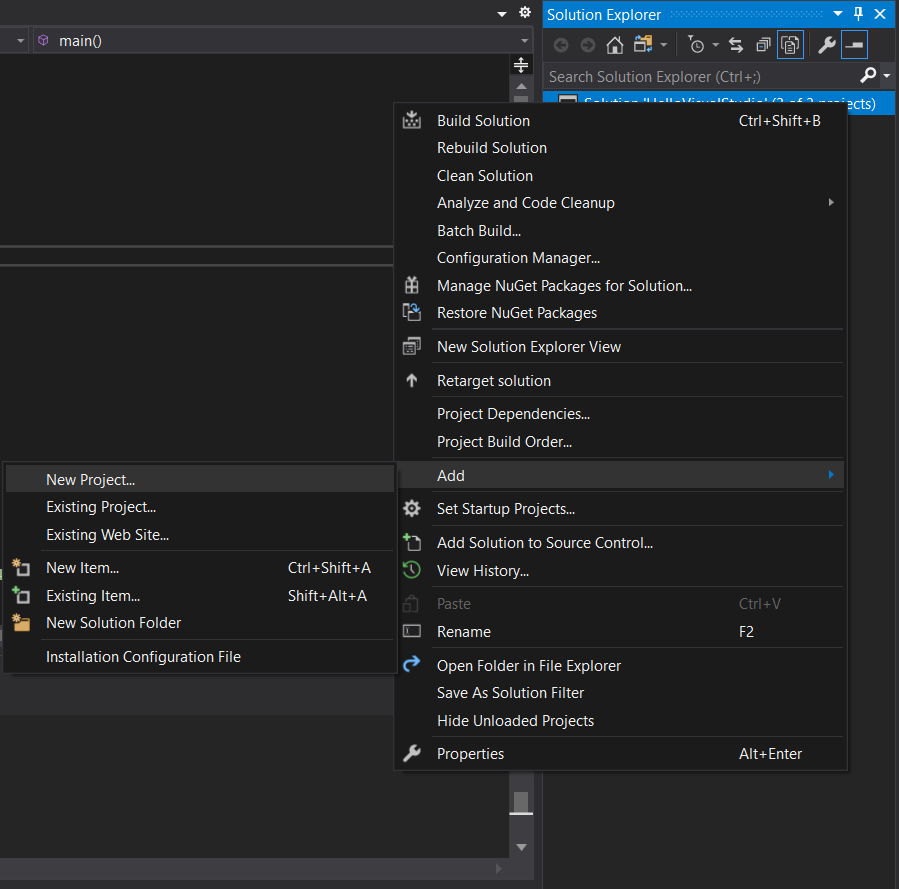
Instead, we can create a new project.
Right click the solution --> Add --> New Project. Then go through the same steps you did in the
beginning. When it prompts you what to call your new project, call it "HelloLibsndfile". Then hit
the 3 dots to open up the file explorer, create a new folder called "HelloLibsndfile", and place the
project in that folder.
Right click this new project --> Add --> New Item and make a cpp file called "HelloLibsndfile.cpp". Copy the contents of your previous code into this new one. You can then undo all the changes you made in your "HelloVisualStudio.cpp" file and keep it as the default hello world.
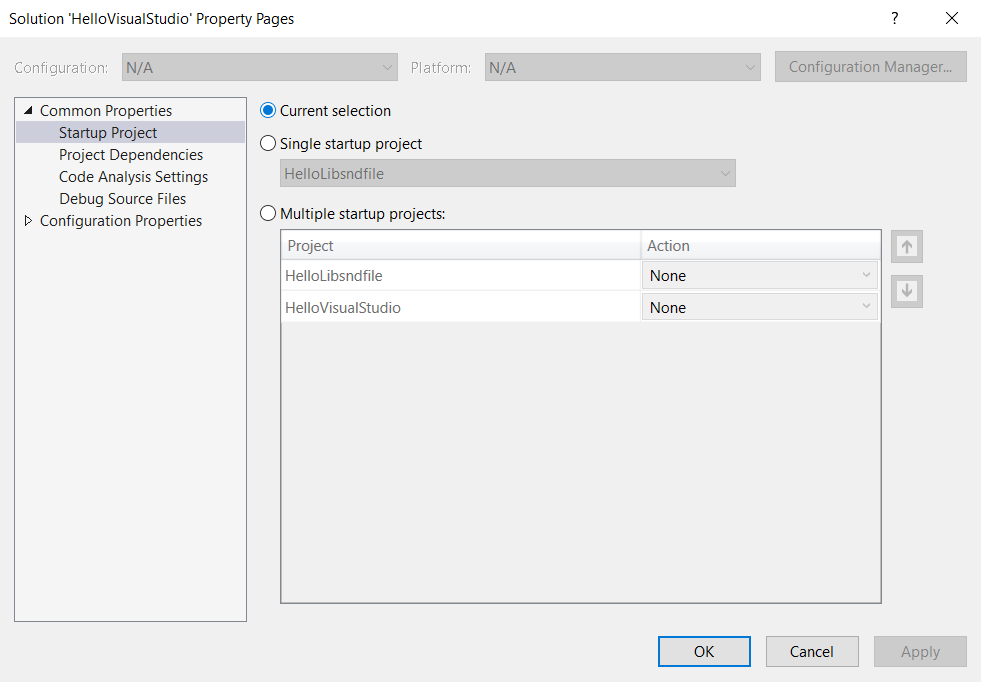
To select this new project and run another project, click on the project in the Solution Explorer.
If it doesn't get highlighted, right click on your solution --> Properties --> Check the current
selection radio button.
 The next caveat is that we have to move our
 chirp_441.wav file into this new
HelloLibsndfile folder. The working directory of any source code will be the same directory as the
project file.
FFTW
Introduction
FFTW is a C library used for Fast Fourier Transforms. The acronym is the whimsical title "Fastest Fourier Transform in the West," and it earns its name because it's pretty darn fast! Version 3.3.8 was released in May 2018. It's so popular that CUDA based its cuFFT library off FFTW and includes FFTW interfaces to cuFFT. I've used it for real-time signal processing, notably with Jefferson, and for my convolution reverb benchmarks.
Installation
Lucky for us, the MIT folks over at FFTW have pre-compiled DLLs for us. You can download them here. You will, however, need to generate the statically linked libraries. They detailed it for us in their documentation. Open the Visual Studio command prompt, which you can search in Start as "Developer Command Prompt for VS 2019". Navigate into the unzipped file you just downloaded and run
lib /def:libfftw3-3.def
lib /def:libfftw3f-3.def
lib /def:libfftw3l-3.defD:\Visual Studio Dependences that contains all of my third party libraries. I
have a bin, inc, and lib folder that contain all of my DLLs, include headers, and libraries
respectively. That way whenever I create a project, I can just reference that folder which has all
of them. I still have to copy my DLLs to C:\Windows\System32, but this way they're all
in one place. I copied my lib files into D:\Visual Studio Dependences\lib and the DLL into
C:\Windows\System32.
Demo Source Code
Let's write a basic offline convolution reverberator! If you're unfamiliar with the intricacies of convolution reverb, the algorithm is relatively simple -- from a computation standpoint. You take your input signal, transform it into the frequency domain via the FFT. Then take your impulse response and transform it into the frequency domain. Pointwise multiply the two arrays. Transform the product back into the time domain and divide by the length of your FFT (or more, if your audio is clipping). Then the nuances come in -- you should have your FFT size be a power of 2, you can do in-place FFT transforms, etc.
Here's a minimal example of convolution reverb. I also use floats instead of doubles whenever I do
FFTs since I'm concerned about real-time performance, which is why you see fftwf
everywhere.
#pragma once

#include <iostream>
#include <sndfile.hh>
#include <fftw3.h>

// Helper function to find next power of 2 using bit twiddling
int next_pow_2(int x) {
    x--;
    x |= x >> 1;
    x |= x >> 2;
    x |= x >> 4;
    x |= x >> 8;
    x |= x >> 16;
    x++;
    return x;
}

// Helper function for complex multiplcation into array A
void pointwiseMultiplication(fftwf_complex* a, fftwf_complex* b, int size) {
    for (int i = 0; i < size; i++) {
        fftwf_complex temp;
        temp[0] = a[i][0];
        temp[1] = a[i][1];
        a[i][0] = temp[0] * b[i][0] - temp[1] * b[i][1];
        a[i][1] = temp[0] * b[i][1] + temp[1] * b[i][0];
    }
}
int main() {
    std::cout << "Our input/output filenames" << std::endl;
    std::string input = "chirp_441.wav";
    std::string reverb = "reverb_mono_441.wav";
    std::string output = "output.wav";

    std::cout << "Instantiate the soundfile object and open the input/reverb file" << std::endl;
    SndfileHandle ifile = SndfileHandle(input);
    SndfileHandle rfile = SndfileHandle(reverb);
    if (ifile.channels() != 1 || rfile.channels() != 1) {
        std::cout << "ERROR: Only taking mono files for this example" << std::endl;
        exit(EXIT_FAILURE);
    }
    int padded_length = next_pow_2(ifile.frames() + rfile.frames());
    std::cout << "Create special FFTW3 array to store our audio. Adding 2 to do in-place FFT" << std::endl;
    float* input_buf = fftwf_alloc_real((size_t)padded_length + 2);
    float* reverb_buf = fftwf_alloc_real((size_t)padded_length + 2);

    std::cout << "Filling arrays with input audio and padding with zeros" << std::endl;
    ifile.readf(input_buf, ifile.frames());
    for (int i = ifile.frames(); i < padded_length; i++) {
        input_buf[i] = 0.0f;
    }
    rfile.readf(reverb_buf, rfile.frames());
    for (int i = rfile.frames(); i < padded_length; i++) {
        reverb_buf[i] = 0.0f;
    }

    std::cout << "Creating FFT plans" << std::endl;
    fftwf_plan in_plan = fftwf_plan_dft_r2c_1d(padded_length, input_buf, (fftwf_complex*)input_buf,
        FFTW_ESTIMATE);
    fftwf_plan out_plan = fftwf_plan_dft_c2r_1d(padded_length, (fftwf_complex*)input_buf, input_buf,
        FFTW_ESTIMATE);

    std::cout << "Transforming inputs" << std::endl;
    fftwf_execute(in_plan);
    fftwf_execute_dft_r2c(in_plan, reverb_buf, (fftwf_complex*)reverb_buf);

    std::cout << "Multiplying in the frequency domain" << std::endl;
    pointwiseMultiplication((fftwf_complex*)input_buf, (fftwf_complex*)reverb_buf, padded_length);

    std::cout << "Transforming back into the time domain" << std::endl;
    fftwf_execute(out_plan);

    std::cout << "Peak normalizing the audio (because this is reverb, not a filter)" << std::endl;
	float max = 0;
	for (int i = 0; i < padded_length; i++) {
		if (fabs(input_buf[i]) > max) {
			max = fabs(input_buf[i]);
		}
	}
	for (int i = 0; i < padded_length; i++) {
		input_buf[i] /= max;
	}

    std::cout << "Open output file" << std::endl;
    SndfileHandle ofile = SndfileHandle(output, SFM_WRITE, SF_FORMAT_WAV | SF_FORMAT_PCM_24, 1, ifile.samplerate());

    std::cout << "Write to output. For this example, no error checking." << std::endl;
    size_t count = ofile.write(input_buf, ifile.frames() + rfile.frames() - 1);

    std::cout << "Cleanup" << std::endl;
    fftwf_free(input_buf);
    fftwf_free(reverb_buf);
    fftwf_destroy_plan(in_plan);
    fftwf_destroy_plan(out_plan);
}
Dependencies
Make sure that your project links to libsndfile-1.lib;libfftw3f-3.lib and that your
enter the proper include and lib directories, found in the libsndfile section.
Now we have a reverberated sine sweep!
Portaudio
Introduction
Portaudio is a C library that allows you to interact with your computer's microphone and speakers. It's developed and maintained by Phil Burk, who originally created it to use with JSyn - something I studied and used in a class by Nick Didkovsky. It's a cross-platform library with very good Windows support. Under the hood, it supports all of the Windows audio APIs (WMME, DirectSound, WDM/KS, ASIO, WASAPI), macOS's CoreAudio, and all of the Linux APIs (JACK, ALSA, ASIHPI). It is essentially a wrapper around all of these native APIs and allows a programmer to write one portaudio program that will run on all platforms.
Portaudio works via a custom callback function. Callback functions run in a separate thread and are run independently from your main program. In the case of portaudio, this function will get called at audio rate, which can be every 5 - 50 ms depending on the size of your buffer. This lets us to do real-time audio processing!
The slight downside of using portaudio is that we have to compile it completely from source. It's
actually
already built-in to Ubuntu's package manager as portaudio19-dev. For Windows, we have
to
download the tarball and install it from scratch in order to get our .lib and
.dll files. So let's do it!
Compiling From Source
Recommended Software
The latest stable release is from October 2016, and you can download the tarball here. A tarball is similar to a
.zip file. It's used more often on Unix systems. You can unzip it using 7-zip. Right
click on the tarball --> 7-Zip --> extract to pa_stable_v190600_20161030. Unfortunately, 7-Zip is a
little weird, so you have to go into that directory and unzip it again.
Now you can see the source code, the CMake scripts, and everything. You could go into
build/msvc and open up that (very outdated) VS solution, but I recommend using the GUI
CMake. CMake is a built tool that will generate a VS2019 solution based off specific parameters. I'm
choosing to use CMake over the existing VS solution since upgrading VS solutions can get finicky and
buggy. However, I want to compile portaudio with ASIO support, since that will be crucial for
low-latency real-time applications. You can find more instructions on how to build with ASIO at the portaudio
documentation. Essentially, sign up for a Steinberg developer account and copy the source
code into src/hostapi/asio. However, there is a slight problem with their CMake
script that causes it to not recognize the ASIO SDK. You will need to go into
cmake_support/FindASIOSDK.cmake and modify line 15. Originally the line is:
file(GLOB results "${CMAKE_CURRENT_SOURCE_DIR}/../as*")file(GLOB results "${CMAKE_CURRENT_SOURCE_DIR}/src/hostapi/asio")src/hostapi/asio/ASIOSDK. Do not do this. This will cause CMake to not recognize ASIO. Copy
the contents of
your ASIOSDK2.3.2 folder into src/hostapi/asio so that you see
src/hostapi/asio/common
Open up CMake and put in the directory of the source code, which should be where you unzipped
the tarball the second time in a folder called portaudio. Under the build location, you
can put it anywhere you want. I chose to put it in build/vs2019 so that way it's in the
build folder, but in a different location than the msvc folder. Next, hit "Configure" on the bottom.
When it prompts you to create a new directory, hit yes. Use the default native compilers unless you
know your way around CMake. You should see something like this.
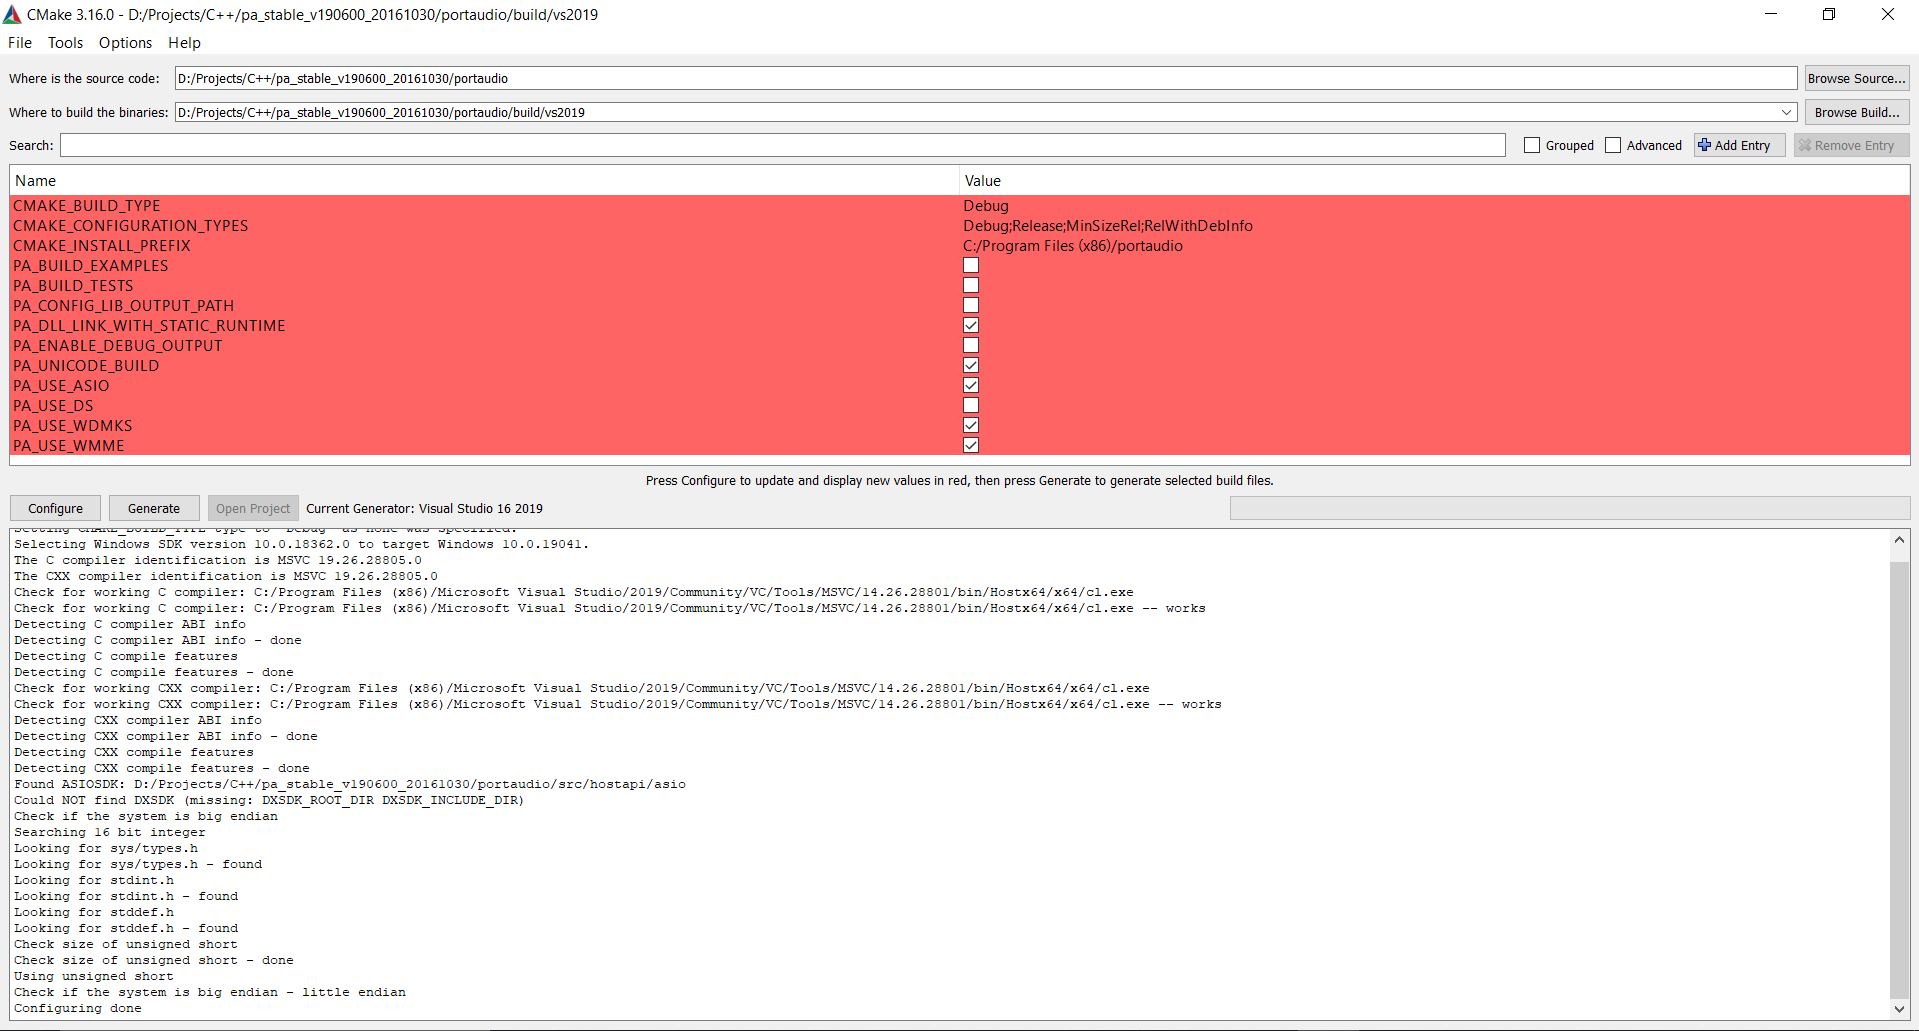
Make sure that the printout says "Found ASIOSDK". Next, check "PA_USE_ASIO". I am also choosing to check "PA_BUILD_EXAMPLES", "PA_BUILD_TESTS", and "PA_ENABLE_DEBUG_OUTPUT". Now hit "Generate" to create the Visual Studio 2019 Solution and "Open Project" to launch it.
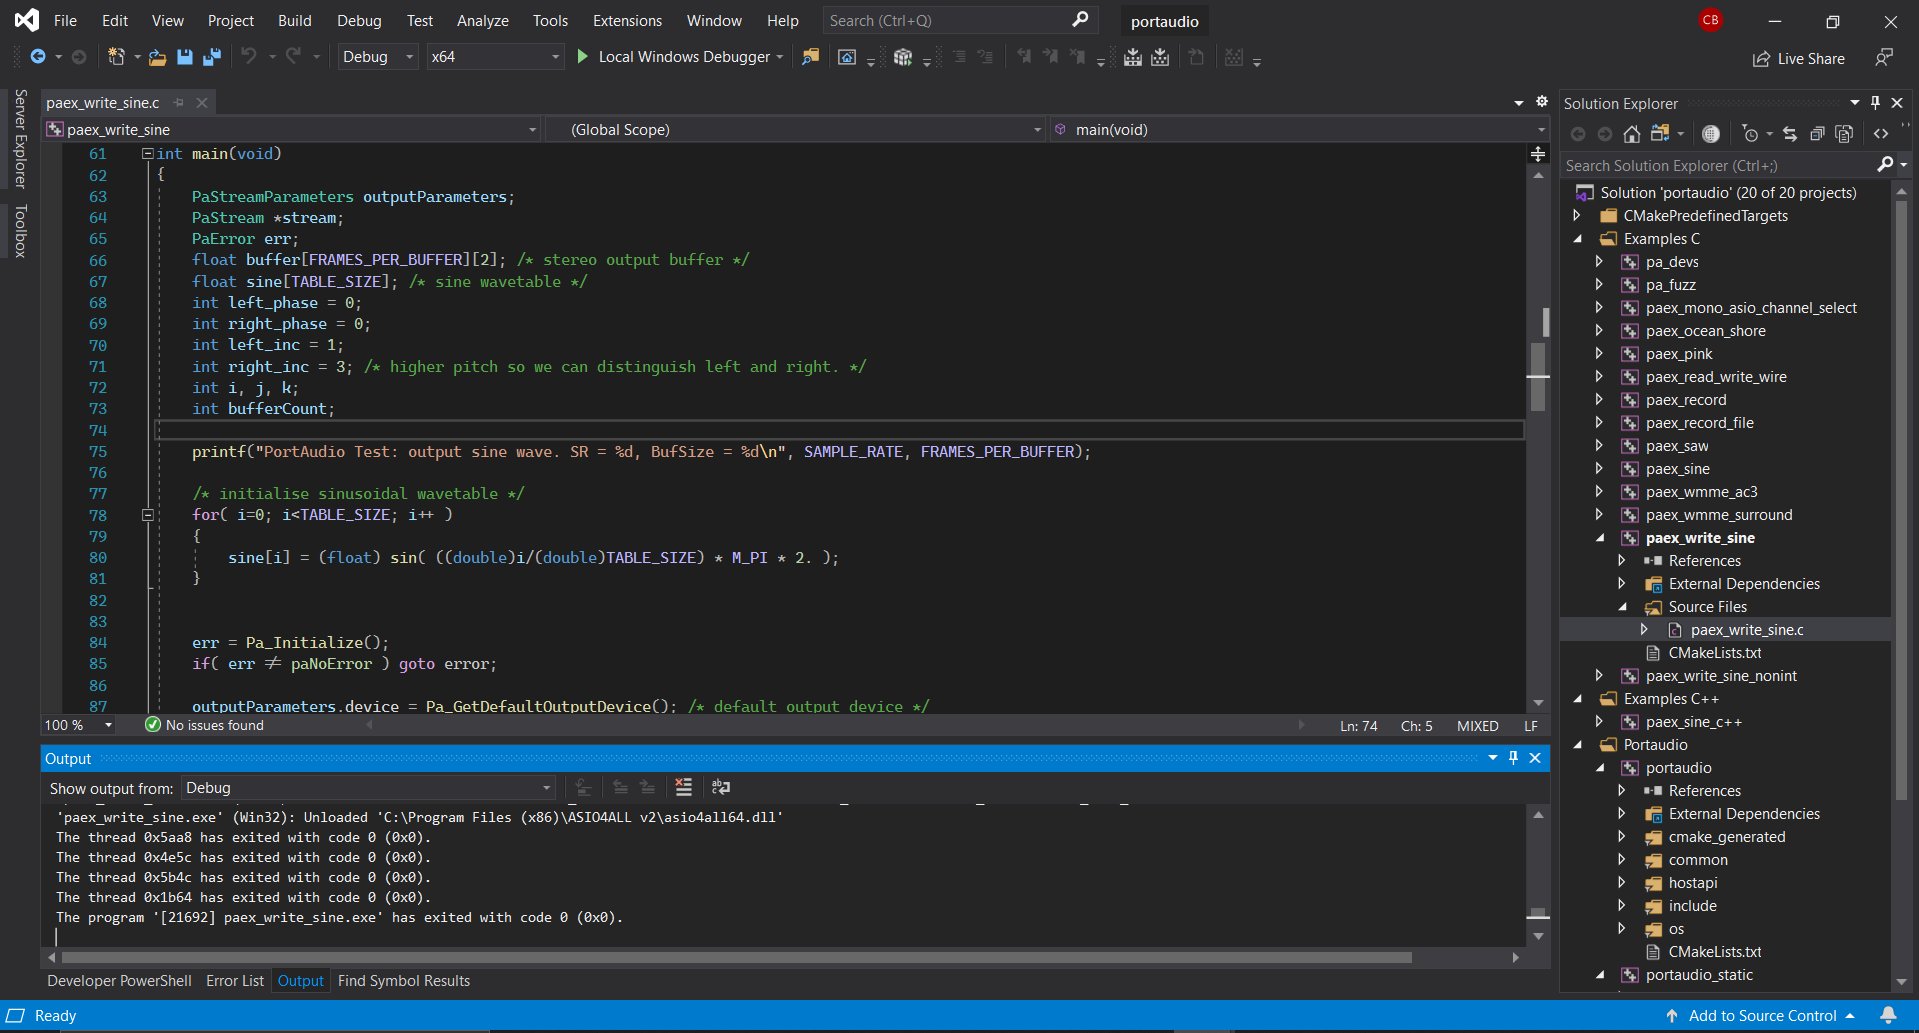
You will see a lot of VS filters and VS projects. Hit Ctrl + B to build portaudio. Right click the solution to allow you to build and run other projects. Here, you can run several of the test and example projects if you click on each individual project. This is a good check to make sure that it is working. If something went wrong in the build, make sure that the CMakePredefinedTargets --> ALL_BUILD is selected as the project.
Hooray! Now you have compiled portaudio with ASIO support, and you can find the static lib file in
build/vs2019/Debug/portaudio_static_x64.lib and the dll in
build/vs2019/Debug/portaudio_x64.dll. If you don't like the debug printouts, you
can re-do the CMake build and uncheck "PA_ENABLE_DEBUG_OUTPUT".
I've installed several libraries and compiled several libraries like this, so I created a separate
folder in D:\Visual Studio Dependences that contains all of my third party libraries. I
have a bin, inc, and lib folder that contain all of my DLLs, include headers, and libraries
respectively. That way whenever I create a project, I can just reference that folder which has all
of them. I still have to copy my DLLs to C:\Windows\System32, but this way they're all
in one place.
Portaudio Demo
Okay, let's get back to our original HelloVisualStudio solution and use our newly compiled
portaudio library. Create a new project called HelloPortaudio. Add the include directory and
library directory. Mine will be pointing to D:\Visual Studio Dependences\include
and D:\Visual Studio Dependences\lib. Either copy the DLL into the working
directory, or copy it into C:\Windows\System32. My source code is divided into
source files and one header file that will just play back what is heard from your default
microphone for 20 seconds.
#include "audio.h"

#include
#include


int main() {
    initializePA(44100);
    std::this_thread::sleep_for(std::chrono::seconds(20));
    closePA();
} #pragma once
#ifndef _AUDIO_H_
#define _AUDIO_H_
#include
#include
#include
#include
const int FRAMES_PER_BUFFER = 512;
static int paCallback(const void* inputBuffer, void* outputBuffer,
unsigned long framesPerBuffer,
const PaStreamCallbackTimeInfo* timeInfo,
PaStreamCallbackFlags statusFlags,
void* userData);
void initializePA(int fs);
void closePA();
#endif
#include "audio.h"

PaStream* stream;

void initializePA(int fs) {
    PaError err;
    /*PortAudio setup*/
    PaStreamParameters outputParams;
    PaStreamParameters inputParams;

    /* Initializing PortAudio */
    err = Pa_Initialize();
    if (err != paNoError) {
    printf("PortAudio error: %s\n", Pa_GetErrorText(err));
    printf("\nExiting.\n");
    fprintf(stderr, "PortAudio error: %s\n", Pa_GetErrorText(err));
    fprintf(stderr, "\nExiting.\n");
    exit(1);
    }

    /* Input stream parameters */
    inputParams.device = Pa_GetDefaultInputDevice();
    inputParams.channelCount = 1;
    inputParams.sampleFormat = paFloat32;
    inputParams.suggestedLatency =
    Pa_GetDeviceInfo(inputParams.device)->defaultLowInputLatency;
    inputParams.hostApiSpecificStreamInfo = NULL;

    /* Ouput stream parameters */
    outputParams.device = Pa_GetDefaultOutputDevice();
    outputParams.channelCount = 2;
    outputParams.sampleFormat = paFloat32;
    outputParams.suggestedLatency =
    Pa_GetDeviceInfo(outputParams.device)->defaultLowOutputLatency;
    outputParams.hostApiSpecificStreamInfo = NULL;

    /* Open audio stream */
    err = Pa_OpenStream(&stream,
    &inputParams,
    &outputParams,
    fs, FRAMES_PER_BUFFER,
    paNoFlag, /* flags */
    paCallback,
    NULL);
    if (err != paNoError) {
    printf("PortAudio error: open stream: %s\n", Pa_GetErrorText(err));
    printf("\nExiting.\n");
    fprintf(stderr, "PortAudio error: open stream: %s\n", Pa_GetErrorText(err));
    fprintf(stderr, "\nExiting.\n");
    exit(1);
    }

    /* Start audio stream */
    err = Pa_StartStream(stream);
    if (err != paNoError) {
    printf("PortAudio error: start stream: %s\n", Pa_GetErrorText(err));
    printf("\nExiting.\n");
    fprintf(stderr, "PortAudio error: start stream: %s\n", Pa_GetErrorText(err));
    fprintf(stderr, "\nExiting.\n");
    exit(1);
    }

}

void closePA() {
    PaError err;
    /* Stop stream */
    err = Pa_StopStream(stream);
    if (err != paNoError) {
    printf("PortAudio error: stop stream: %s\n", Pa_GetErrorText(err));
    printf("\nExiting.\n");
    fprintf(stderr, "PortAudio error: stop stream: %s\n", Pa_GetErrorText(err));
    fprintf(stderr, "\nExiting.\n");
    exit(1);
    }

    /* Close stream */
    err = Pa_CloseStream(stream);
    if (err != paNoError) {
    printf("PortAudio error: close stream: %s\n", Pa_GetErrorText(err));
    printf("\nExiting.\n");
    fprintf(stderr, "PortAudio error: close stream: %s\n", Pa_GetErrorText(err));
    fprintf(stderr, "\nExiting.\n");
    exit(1);
    }

    /* Terminate PortAudio */
    err = Pa_Terminate();
    if (err != paNoError) {
    printf("PortAudio error: terminate: %s\n", Pa_GetErrorText(err));
    printf("\nExiting.\n");
    fprintf(stderr, "PortAudio error: terminate: %s\n", Pa_GetErrorText(err));
    fprintf(stderr, "\nExiting.\n");
    exit(1);
    }
}
static int paCallback(const void* inputBuffer, void* outputBuffer,
  unsigned long framesPerBuffer,
  const PaStreamCallbackTimeInfo* timeInfo,
  PaStreamCallbackFlags statusFlags,
  void* userData)
{
  float* output = (float*)outputBuffer;
  float* input = (float*)inputBuffer;

  // Sending input directly back to output
  // stereo output is interleaved
  for (unsigned i = 0; i < framesPerBuffer; i++) {
    output[i * 2] = input[i];
    output[i * 2 + 1] = input[i];
  }
  return 0;
}
This code will send audio from your microphone to your speaker, and then timeout after about 20 seconds. A lot of the parameters are hardcoded, such as the input device, output device, frames per buffer, and number of channels. I'll leave it up to you to play around with those parameters and look up what else Portaudio can do.
Conclusion
I hope that this tutorial is useful to whoever lands on this page. This tutorial is an application and coherent explanation of a cumulative ~3 years of self-teaching experience with Visual Studio, libsndfile, portaudio, and CMake. Feel free to email me, make a GitHub issue, make a pull request, or anything if you have any questions, feedback, advice, suggestions, or just anything in general! Here is the link to the GitHub repo paired with this tutorial.
Part 2 of this tutorial will be re-doing all of this with CMake + Visual Studio + WSL! Stay tuned!