Intro To Visual Studio & Audio Programming - Part 2
VS2019 + CMake + WSL
Also known as complete technical jargon if you don't know what these acronyms mean
Table of Contents
Introduction
Welcome back to part 2 of this guide. So in part 1 of this tutorial, I walked you through adding third party audio libraries into your C++ Visual Studio Solutions. I also said that I hadn't looked into Linux development on Windows. I saw that you could create a pure CMake VS template that doesn't use any solutions or project files and was immediately hooked. I'm actually kicking myself because this is so insanely helpful, and I didn't know that this existed while I was writing my thesis. Here is this tutorial's GitHub repo.
Background
Make
For those of you unfamiliar with CMake, it stems from GNU's Make and Makefiles. Makefiles are traditionally the way to compile C programs, especially in Linux. You specify your compiler, parse all of your includes and libraries, and a bunch of nitty gritty compiler commands to build your C program. Makefiles are very precise, and they're used a lot in open source linux packages. The problem with makefiles is that they can be excruciatingly tedious to write, especially when you have a large project with several subprojects. I tried learning Make, but I would always give up out of frustration and just write a bash script with my custom gcc arguments.
CMake
This is where CMake comes in! CMake compiles into makefiles. You specify your includes, libraries, and projects, and then it will run configurations to automatically find your compiler, amongst other things. CMake files are usually pretty short, and it abstracts away many of the makefile details. The best part is that CMake is cross platform. You can build for Windows, Linux, and MacOS with the same CMake script.
Visual Studio & CMake
As of 2016, Microsoft's Visual Studio started adding CMake support into Visual Studio. This has been enhanced in the past few years. Now, you can write code, build, and debug by directly editing the CMake files instead of writing a CMake script, using the CMake GUI to generate a Visual Studio Solution, and see if it works in Visual Studio (I'm guilty of that).
Windows Subsystem for Linux (WSL)
In a nutshell, WSL is a Linuxbox for Windows.
Now you can natively run bash on Windows. This is essentially an official Microsoft
replacement for the long adored Cygwin and MinGW. Those applications allowed you to run a very minimal
set of Linux commands on Windows. Typically, you would use one of those two softwares just to
download Linux compilers and libraries. This did not let you run linux commands like
curl. It was purely used for compiling and building open source C programs. WSL
extends this and lets you run absolutely anything.
WSL started in partnership with Canonical and just the Ubuntu distro, but now there's a ton of other Linux flavors that you can add like Fedora, OpenSuse, Alpine, and CentOS. Plus, you can have multiple Linux flavors on the same Windows machine. The Windows documentation is here There is WSl1 which is essentially a virtual machine and WSL2 which is a real linux kernel shipped with Windows. WSL2 is still only in the Windows Insider edition and is facing a lot of memory management issues right now. A lot of this is still under development during the time of writing, so expect a lot more features to be added afterwards. They just announced a few days ago that WSL will soon have GPU acceleration support -- which is a slight bummer to me since that lack of support was the entire reason why I created my Linux partition. I needed to program with CUDA on Linux, so I made a dual boot to do that.
WSL & VS
In 2019, so last year as of the time of writing, they released WSL integration. This means that you can write your C programs and build it for Windows and Linux in the same VS window! They're continually enhancing this, and last month they released some tools to help with WSL Debugging. It's buggy, but it's very handy and makes cross-platform development so much easier.
Motivation
The reason why this is relevant and important is because it makes deployment so much easier and accessible to a wider audience. Writing your C/C++ program to only work on Windows is very limiting -- especially if it is a command line app that process audio. Visual Studio solutions do not deploy well. Visual Studio upgrades versions every couple of years, so sending VS solutions to people isn't future-proof. Upgrading a VS solution is also destructive process, and many things can go wrong. The MS build tools also changes with every deployment of VS.
More importantly, if you want your software to run on an HPC cluster or on a server, you need to be able to build the software on Linux. You could bypass Windows completely, but then you lose access to amazing graphical debugging tools. Visual Studio has great debugging and profiling tools. My single (non Nvidia) VS extension is ArrayPlotter which is an absolute lifesaver while debugging real-time audio code. Or you can learn gdb and valgrind and debug and profile command line programs like a pro. My workflow is that I will develop on Windows and then deploy on Linux.
After a long winded introduction and background, let's get coding!
Hello World!
Let's recreate our solution from last time, this time using CMake. Start up Visual Studio and create a new project/solution. Under templates, scroll down or search for "CMake Project".
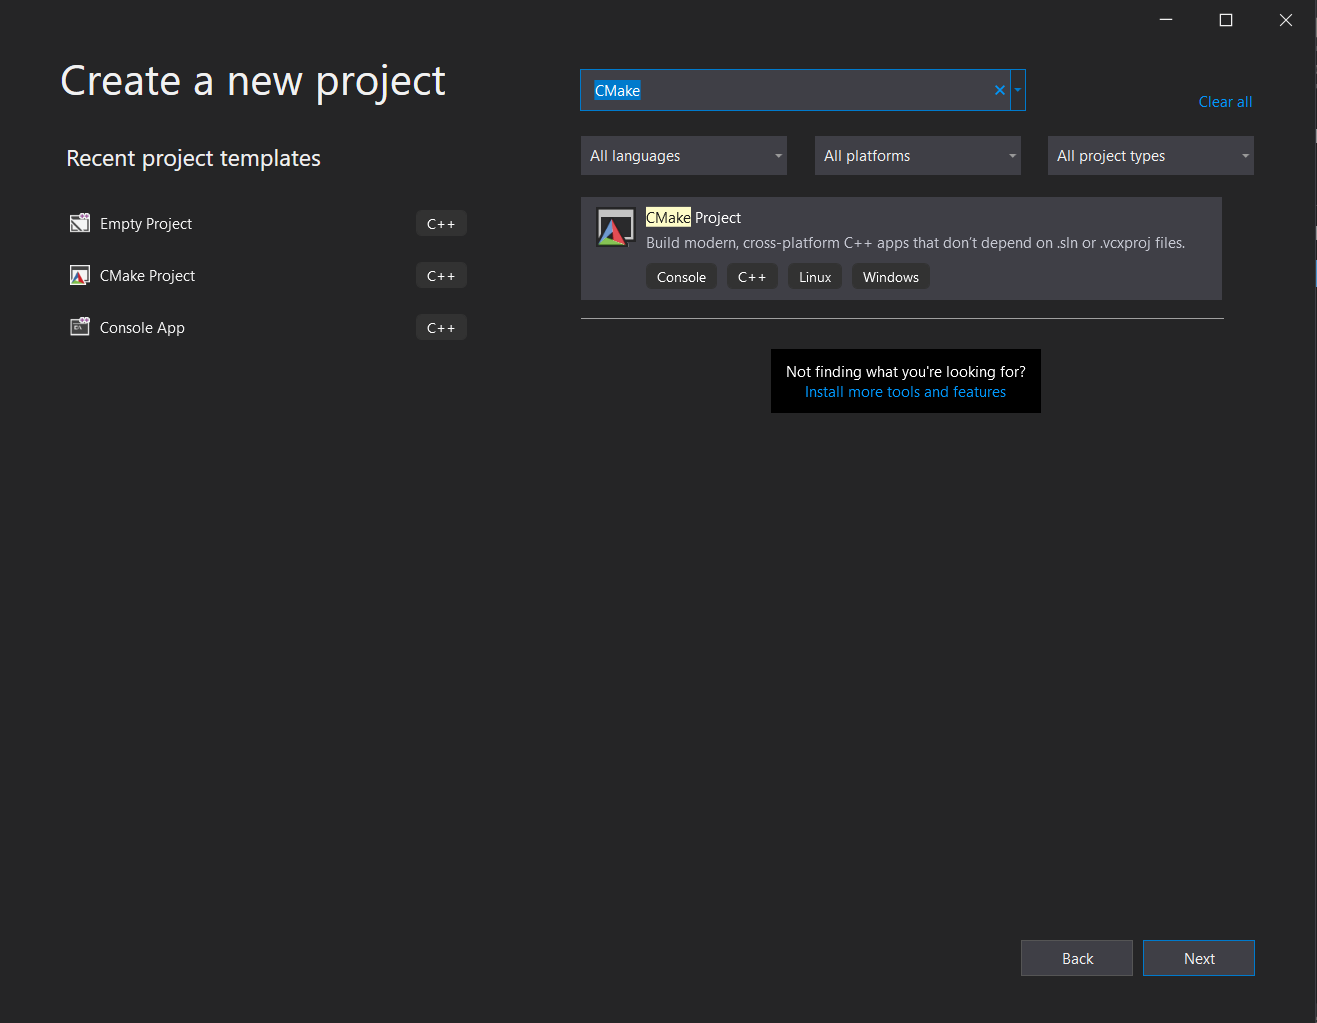
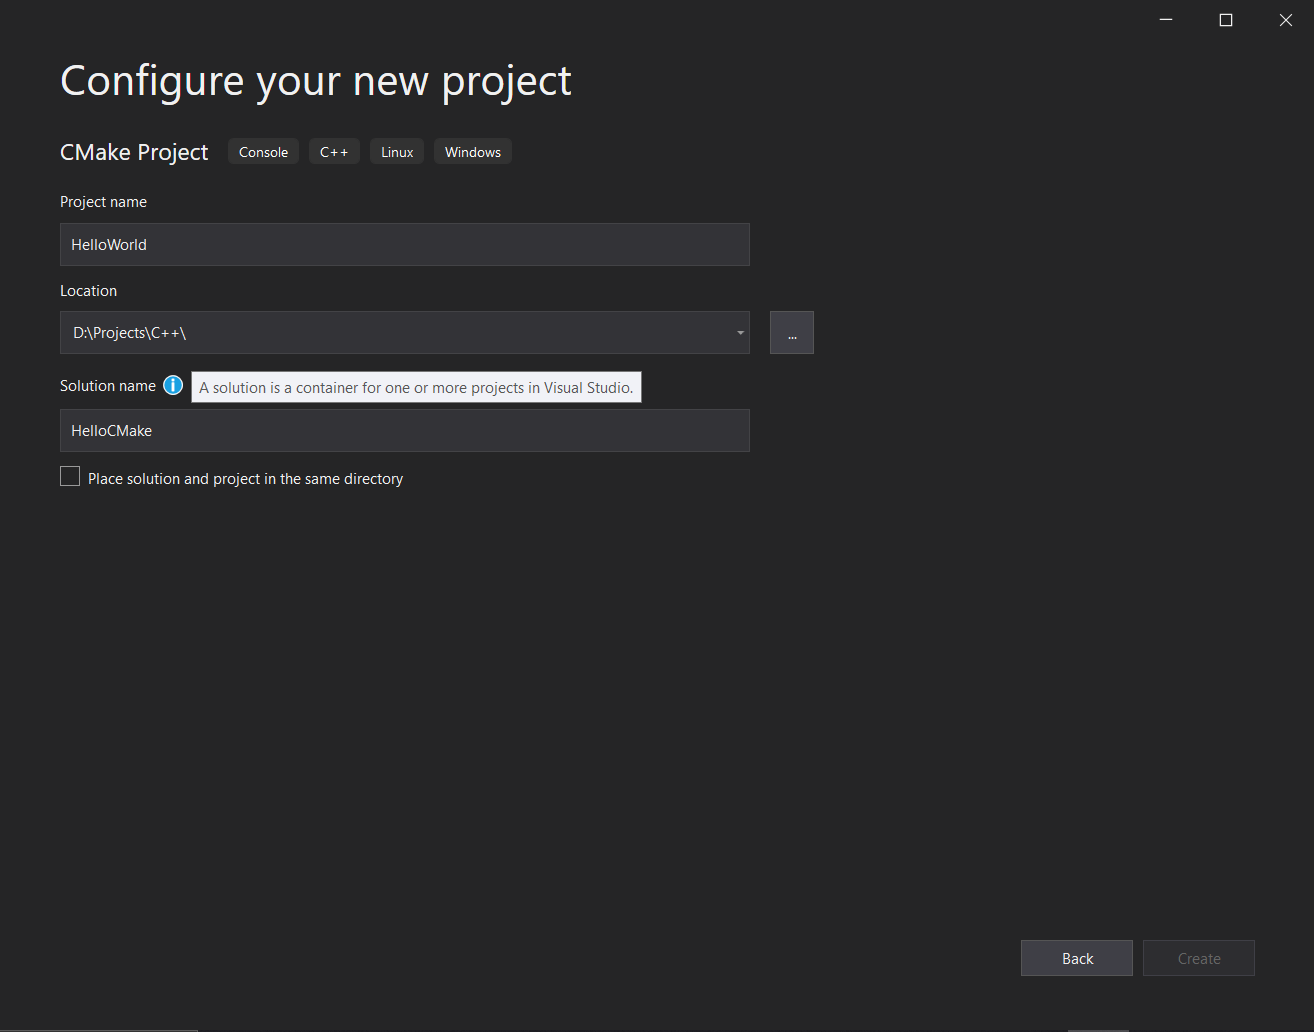
Call the solution HelloCMake and create a project called HelloWorld. Uncheck the box so that way our HelloWorld project is in a separate directory. It's not actually called a project since we're using CMake, but it's a separate executable.
Now, VS will open up and you should see this in the solution explorer.
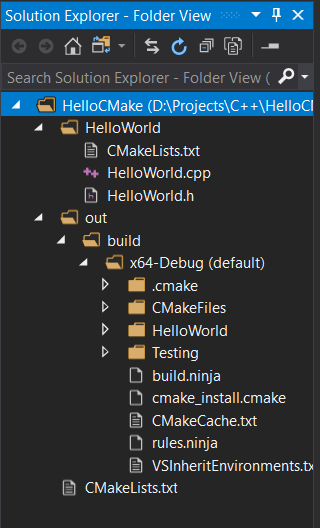
The solution explorer is an exact representation of the folder structure in that directory, unlike
in normal Visual Studio solutions where you have to specify which source files to include. You can
toggle it with the "Show All Files" button to remove the build files. The out folder is
where all of the build files are located. The HelloWorld folder is where that project
and all of its source code is located. In VS terminology, "HelloCMake" is the solution and
"HelloWorld" is a project. In CMake terminology, "HelloCMake" is a project, and "HelloWorld" is a
subproject. I'm going to switch to CMake terminology for the rest of this article.
Every project and subproject will have a CMakeLists.txt file that explains how
it is built. If we look at HelloWorld/CMakeLists.txt, we see this.
# CMakeList.txt : CMake project for HelloWorld, include source and define
# project specific logic here.
#
cmake_minimum_required (VERSION 3.8)

# Add source to this project's executable.
add_executable (HelloWorld "HelloWorld.cpp" "HelloWorld.h")

# TODO: Add tests and install targets if needed.gcc command line argument. In
fact, this g++ command does the same exact thing.
g++ -o HelloWorld HelloWorld.cpp HelloWorld.h
The difference is in the management. If you create a new file in VS, then it gets
auto-populated here. Also, the build output is under out/build/x64-Debug (default)
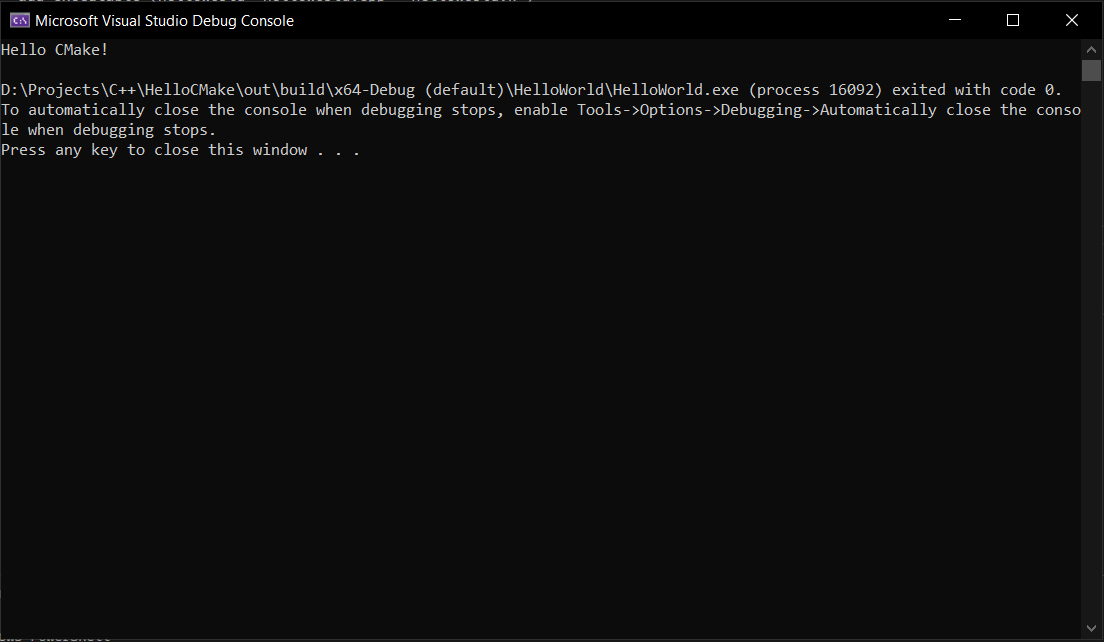
So now if you hit the play button, we have our Hello World!
Bulding in WSL
Nice, we've used CMake for the first time. However, the entire point of doing this in CMake was for cross-platform comapatability. Let's build it in WSL next. This assumes you have already setup WSL. If not, you can go to Microsoft's documentation and set it up.
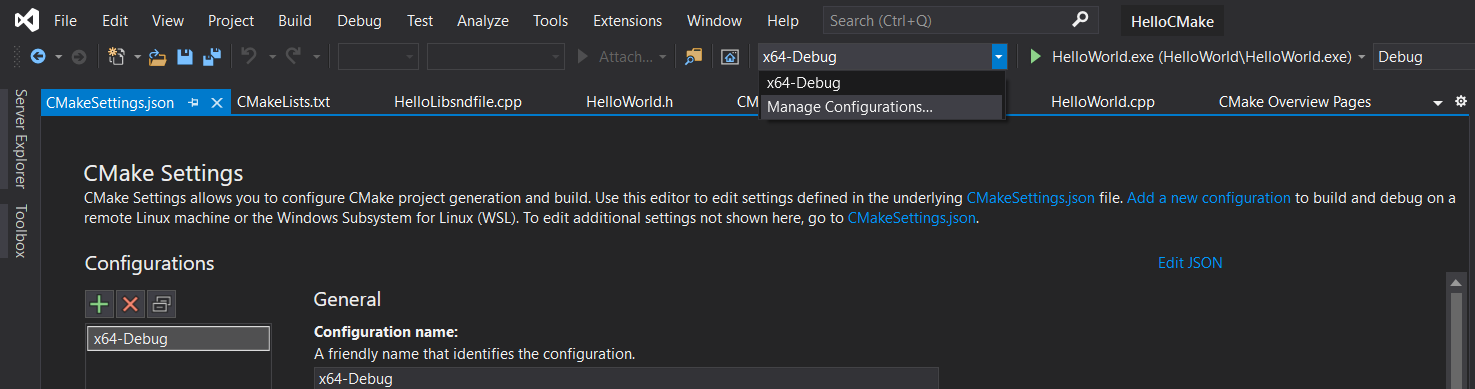
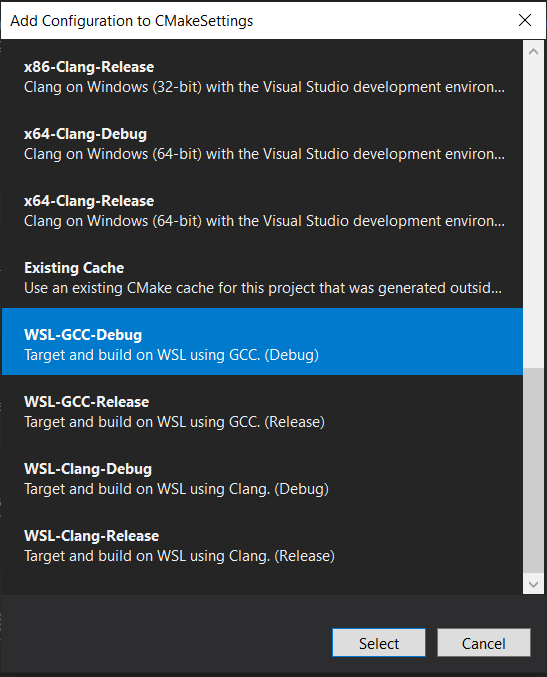
Go up to the top where it says "x64-Debug", click the down arrow, and click "Manage Configurations". This will bring up CMakeSettings.json. Click the green plus button to add a new configuration and scroll down to "WSL-GCC-Debug" and hit Select. Then save the file with Ctrl + S.
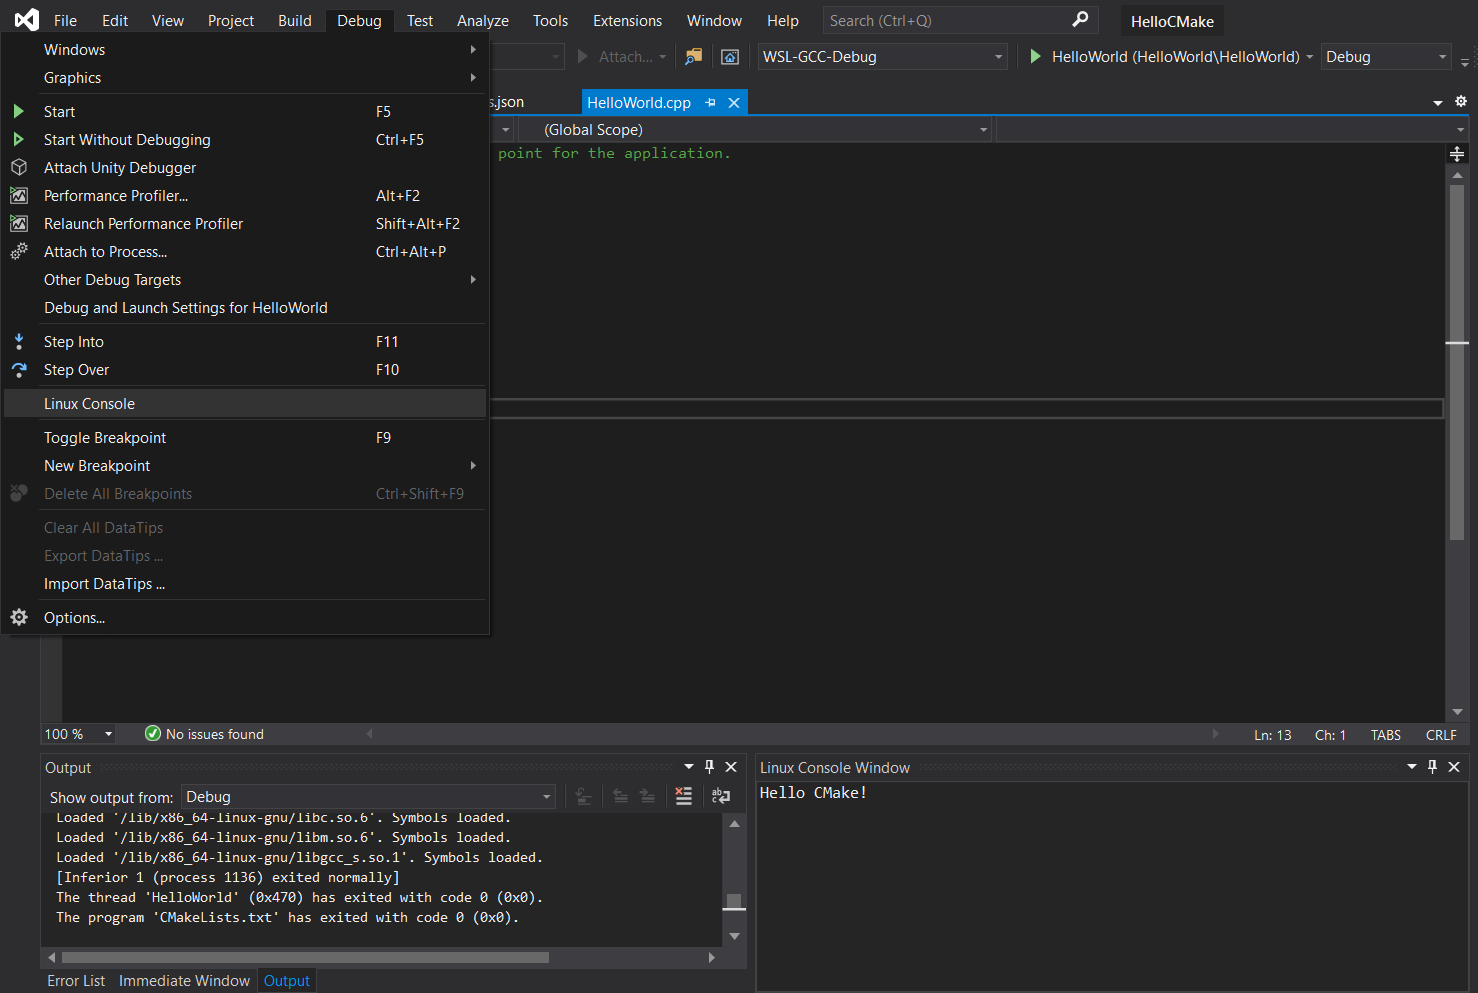
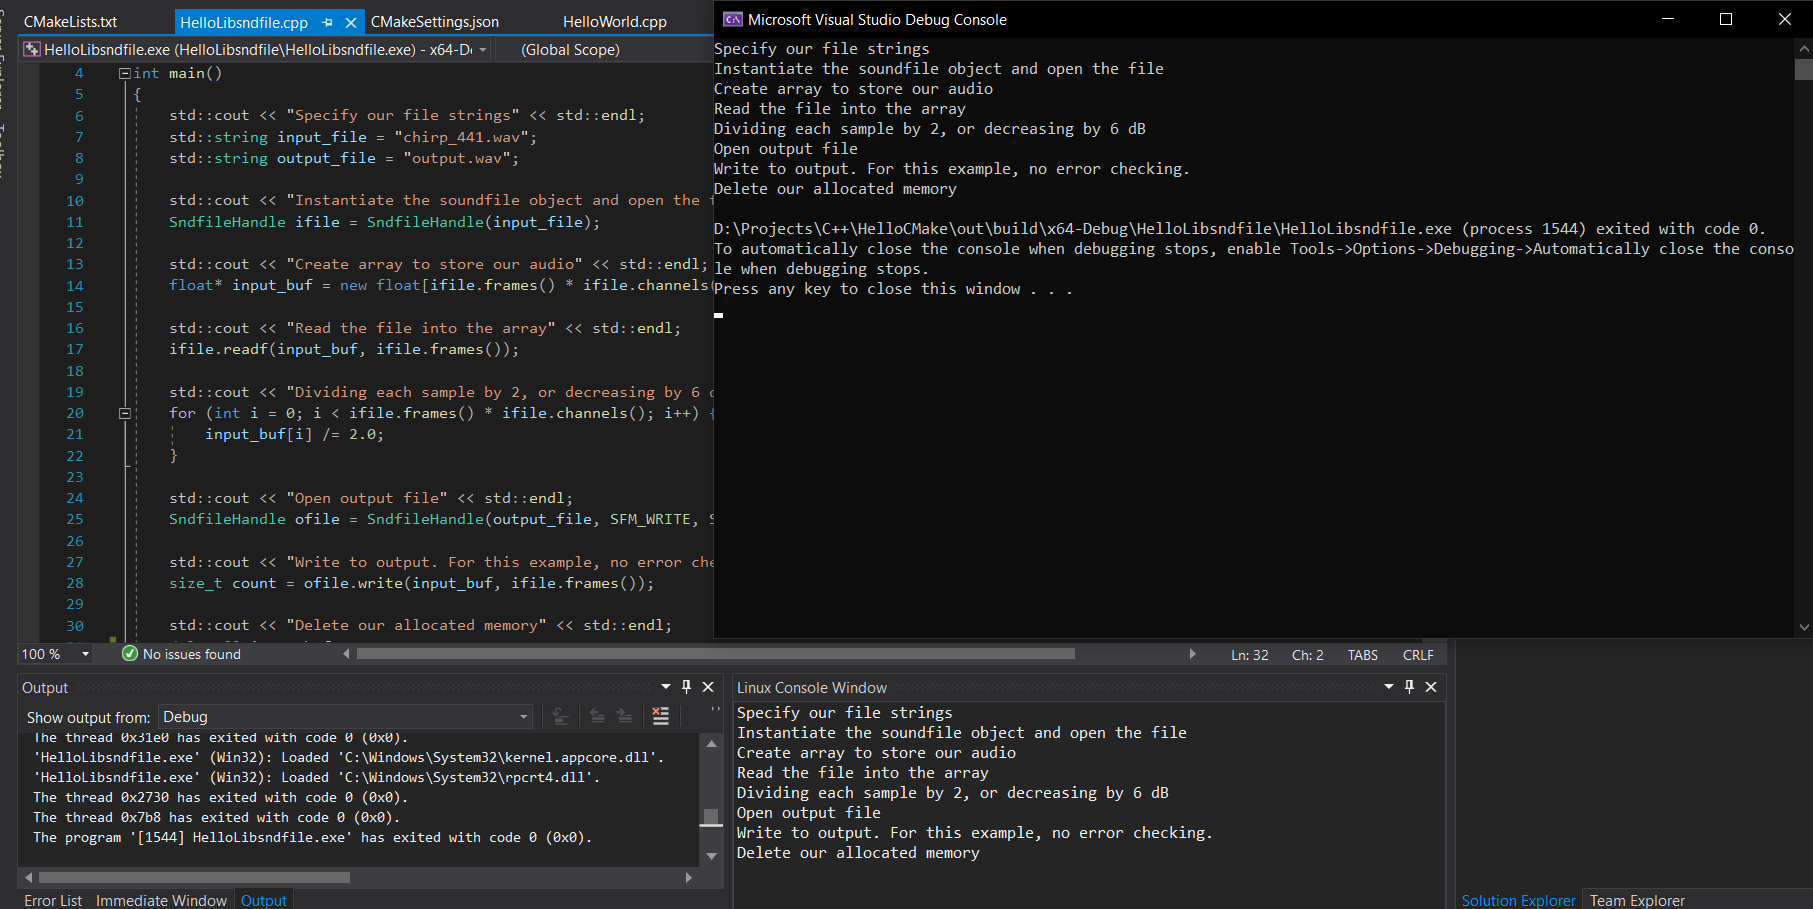
Leave everything to its default and then select "WSL-GCC-Debug" in the Build Configurations on top next to the play button. Next, we need to open up the Linux Debug Console to see what's going on in our program since the Linux commands function differently than the Windows ones. Go to Debug --> Linux Console and put it at the bottom so we can see our program print to the screen after exit. Hit run, and it will appear in the console!
Libsndfile
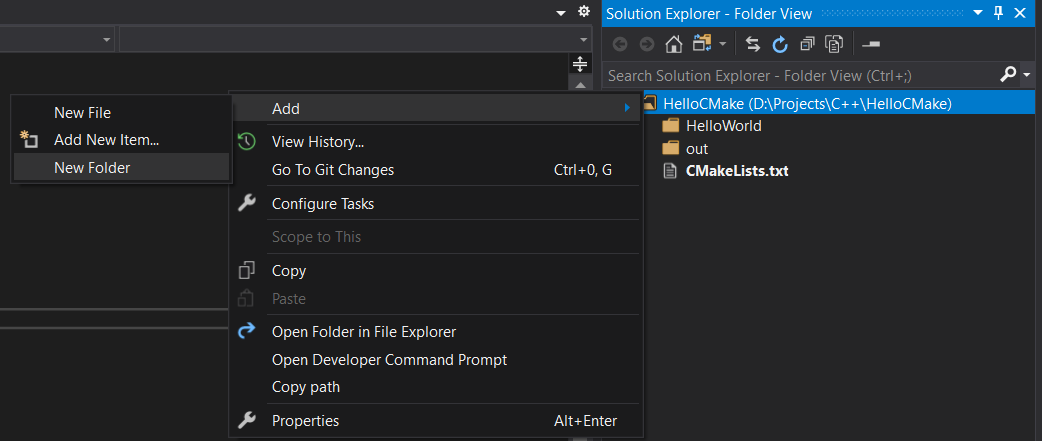
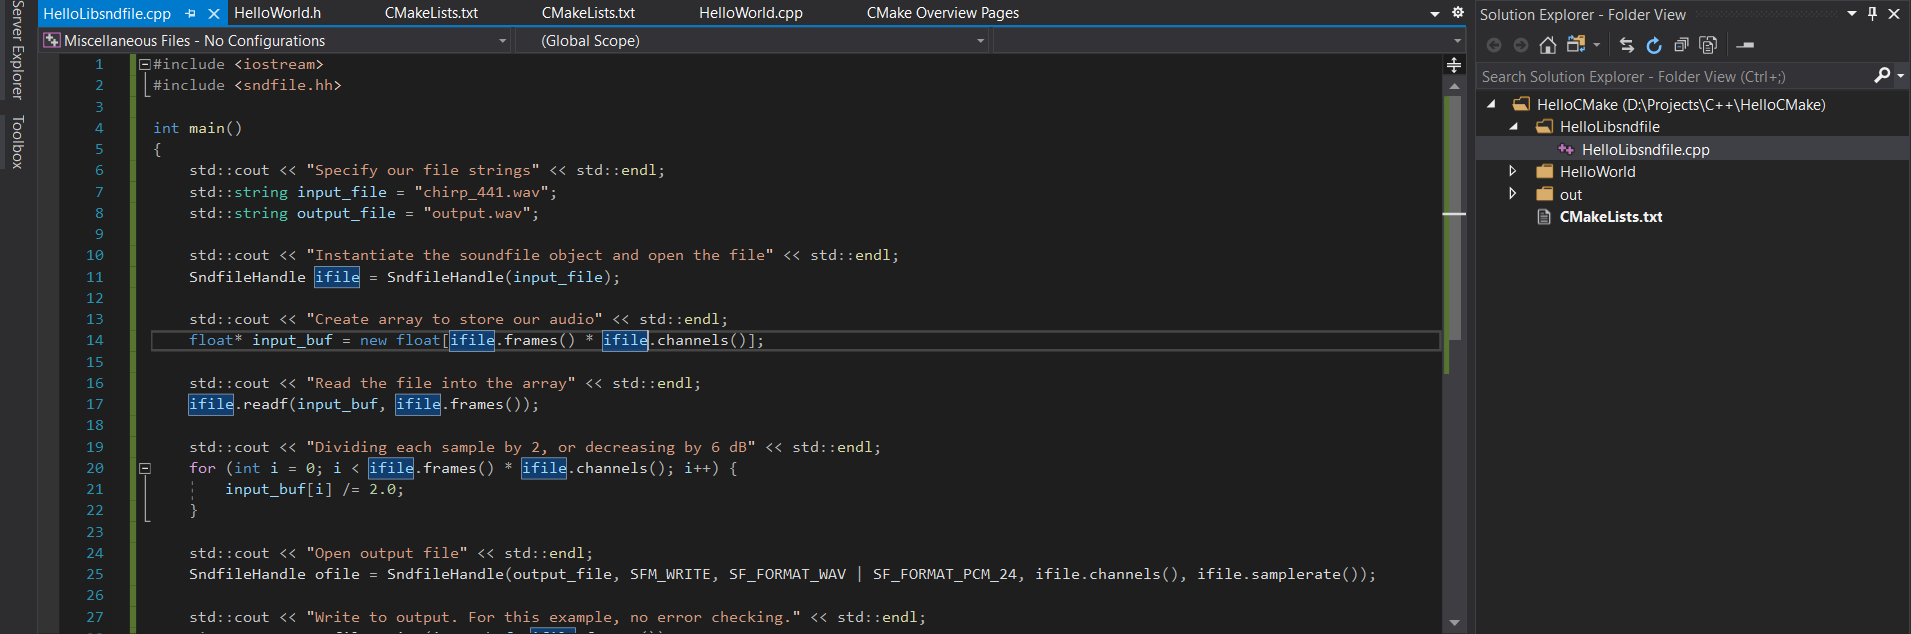
Okay. Let's do the same thing we did before and add our audio libraries. We will also create them as separate subprojects. Right click on the project folder --> Add --> New Folder. You can also do this manually in File explorer, VSCode, or wherever. The directory structure in the Solution Explorer is the exact same as on your hard drive.
Create a new file, call it HelloLibsndfile.cpp, and copy in the same code as before.
Next, we need to modify our CMake scripts. Go to the root directory and edit the
CMakeLists.txt file, adding
add_subdirectory ("HelloLibsndfile")HelloLibsndfile directory and create a CMakeLists.txt file. You can copy the
one from HelloWorld, but change the executable name and source file names. Now, we need to add our
library and header files. I'm going to use my self-created include and lib folders just like I showed in
part 1. You can use C:\Program Files\Mega-nerd\libsndfile.
However, we need to add the Linux libraries and include paths as well. To install libsndfile in Ubuntu, run
sudo apt install libsndfile1-dev/usr/include and the so file is in
/usr/lib/x86_64-linux-gnu. When that's all said and done, it looks like this in our
CMakeLists.txt file.
cmake_minimum_required (VERSION 3.8)

# Add include directories & libraries
if (WIN32)
    set ( PROJECT_LINK_LIBS libsndfile-1.lib)
    link_directories("D:\\Visual Studio Dependences\\lib")
    include_directories("D:\\Visual Studio Dependences\\include")
else (WIN32)
    set(PROJECT_LINK_LIBS sndfile.so)
    link_directories(/usr/lib/x86_64-linux-gnu)
    include_directories(/usr/include)
endif (WIN32)

# Compile
add_executable (HelloLibsndfile "HelloLibsndfile.cpp")

# Add to linker
target_link_libraries(HelloLibsndfile ${PROJECT_LINK_LIBS} )
link_directories specifies the location of the lib files, and this is a space separated
list. include_directories does the same thing for include files. The if/else statement is
to account for both Windows and Linux. Lastly, the target_link_libraries command will link
the library files to our executable.
The slight catch with this way of building is that the executable is in
out/build/BUILD_TYPE/SUBDIRECTORY-NAME. If you want to reference external files like
wave files, make sure to change the paths in the code to account for this. All paths will be
relative to the executable.
Make sure to select the correct startup item before hitting the play button. But now you should be able to run it on both WSL and on Windows.
FFTW
Let's repeat the process for FFTW. Create a new subproject, add that subproject name to the root CMakeLists.txt file, copy the source files in, and then create a CMakeLists.txt.
You can install fftw3 with
sudo apt install libfftw3-devcmake_minimum_required (VERSION 3.8)
# Add include directories & libraries
if (WIN32)
set ( PROJECT_LINK_LIBS libsndfile-1.lib libfftw3f-3.lib)
link_directories("D:\\Visual Studio Dependences\\lib")
include_directories("D:\\Visual Studio Dependences\\include")
else (WIN32)
set(PROJECT_LINK_LIBS sndfile.so fftw3f.so)
link_directories(/usr/lib/x86_64-linux-gnu)
include_directories(/usr/include)
endif (WIN32)
# Compile
add_executable (HelloFFTW "HelloFFTW.cpp")
# Add to linker
target_link_libraries(HelloFFTW ${PROJECT_LINK_LIBS} )
And here is my boilerplate code. One tweak is that I had to add
#include <cmath>.
#pragma once
#include <iostream>
#include <sndfile.hh>
#include <cmath>
#include <fftw3.h>
// Helper function to find next power of 2 using bit twiddling
int next_pow_2(int x) {
x--;
x |= x >> 1;
x |= x >> 2;
x |= x >> 4;
x |= x >> 8;
x |= x >> 16;
x++;
return x;
}
// Helper function for complex multiplcation into array A
void pointwiseMultiplication(fftwf_complex* a, fftwf_complex* b, int size) {
for (int i = 0; i < size; i++) {
fftwf_complex temp;
temp[0] = a[i][0];
temp[1] = a[i][1];
a[i][0] = temp[0] * b[i][0] - temp[1] * b[i][1];
a[i][1] = temp[0] * b[i][1] + temp[1] * b[i][0];
}
}
int main() {
std::cout << "Our input/output filenames" << std::endl;
std::string input = "../../../../chirp_441.wav";
std::string reverb = "../../../../reverb_mono_441.wav";
std::string output = "../../../../output.wav";
std::cout << "Instantiate the soundfile object and open the input/reverb file" << std::endl;
SndfileHandle ifile = SndfileHandle(input);
SndfileHandle rfile = SndfileHandle(reverb);
if (ifile.channels() != 1 || rfile.channels() != 1) {
std::cout << "ERROR: Only taking mono files for this example" << std::endl;
exit(EXIT_FAILURE);
}
int padded_length = next_pow_2(ifile.frames() + rfile.frames());
std::cout << "Create special FFTW3 array to store our audio. Adding 2 to do in-place FFT" << std::endl;
float* input_buf = fftwf_alloc_real((size_t)padded_length + 2);
float* reverb_buf = fftwf_alloc_real((size_t)padded_length + 2);
std::cout << "Filling arrays with input audio and padding with zeros" << std::endl;
ifile.readf(input_buf, ifile.frames());
for (int i = ifile.frames(); i < padded_length; i++) {
input_buf[i] = 0.0f;
}
rfile.readf(reverb_buf, rfile.frames());
for (int i = rfile.frames(); i < padded_length; i++) {
reverb_buf[i] = 0.0f;
}
std::cout << "Creating FFT plans" << std::endl;
fftwf_plan in_plan = fftwf_plan_dft_r2c_1d(padded_length, input_buf, (fftwf_complex*)input_buf,
FFTW_ESTIMATE);
fftwf_plan out_plan = fftwf_plan_dft_c2r_1d(padded_length, (fftwf_complex*)input_buf, input_buf,
FFTW_ESTIMATE);
std::cout << "Transforming inputs" << std::endl;
fftwf_execute(in_plan);
fftwf_execute_dft_r2c(in_plan, reverb_buf, (fftwf_complex*)reverb_buf);
std::cout << "Multiplying in the frequency domain" << std::endl;
pointwiseMultiplication((fftwf_complex*)input_buf, (fftwf_complex*)reverb_buf, padded_length / 2 + 1);
std::cout << "Transforming back into the time domain" << std::endl;
fftwf_execute(out_plan);
std::cout << "Peak normalizing the audio (because this is reverb, not a filter)" << std::endl;
float max = 0;
for (int i = 0; i < padded_length; i++) {
if (fabs(input_buf[i]) > max) {
max = fabs(input_buf[i]);
}
}
for (int i = 0; i < padded_length; i++) {
input_buf[i] /= max;
}
std::cout << "Open output file" << std::endl;
SndfileHandle ofile = SndfileHandle(output, SFM_WRITE, SF_FORMAT_WAV | SF_FORMAT_PCM_24, 1, ifile.samplerate());
std::cout << "Write to output. For this example, no error checking." << std::endl;
size_t count = ofile.write(input_buf, ifile.frames() + rfile.frames() - 1);
std::cout << "Cleanup" << std::endl;
fftwf_free(input_buf);
fftwf_free(reverb_buf);
fftwf_destroy_plan(in_plan);
fftwf_destroy_plan(out_plan);
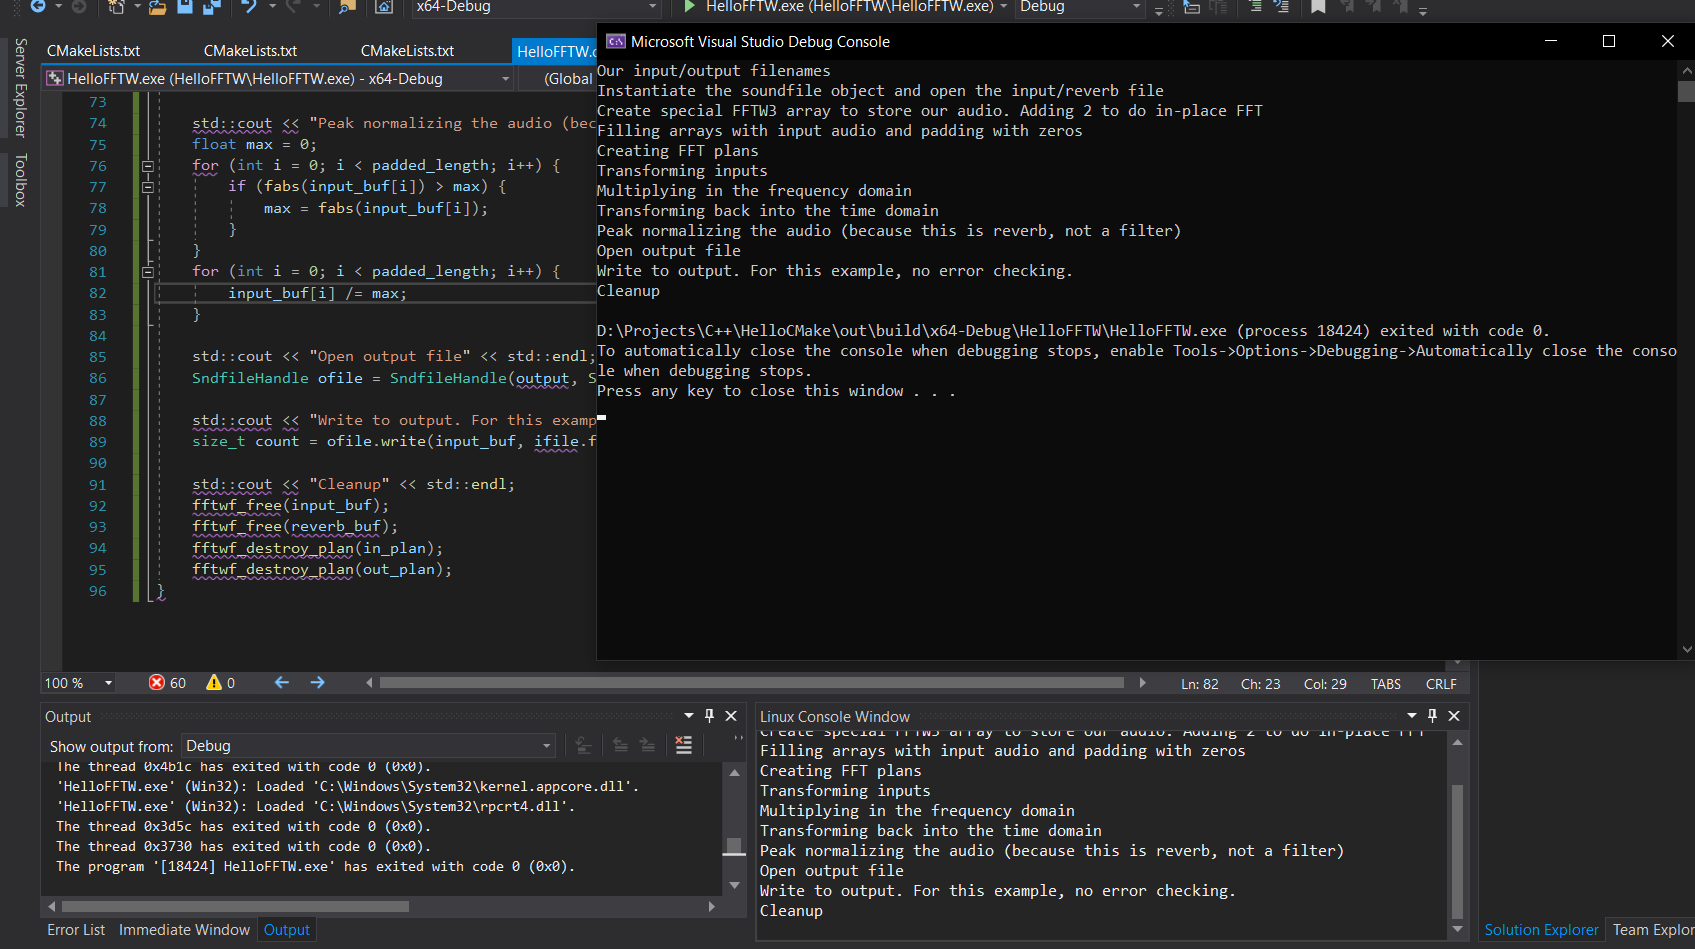
}If all goes well, then you have a cross platform CMake script that builds and runs on Windows and WSL!
Conclusion
I didn't include portaudio because WSL cannot access the computer's audio devices. So we cannot run portaudio applications in WSL. We can compile them, especially since Ubuntu has a package for portaudio, but we can't run them. Running a portaudio application will work on a native Linux platform, especially if you have a dual boot machine like me. Installing portaudio on Ubuntu is as simple as
sudo apt install portaudio19-devlibsndfile
Unfortunately, the WSL integration is very buggy, and it seems that VS isn't mature enough for pure CMake + WSL + VS support yet. It's mainly because the Intellisense support is completely broken. There will be a ton of red error squiggles, but it will compile, build, and run fine. I've also seen purple squiggles and I have no clue what they are. For now at least, you may be better off creating the Microsoft version and then manually running cmake in a terminal to use it on WSL. Building CMake scripts on Linux is easy. It's always some variant of this:
cd /project/dir
mkdir build
cd build
cmake ..
make
cd /mnt/d/Projects/C++/HelloCMake
mkdir build
cd build
cmake ..
make
/mnt/d/Projects/C++/HelloCMake/build. There is a
separate folder for each of the subprojects where you can run ./HelloFFTW
Once this is developed and worked on more, I can see this being an invaluable asset in C++ development. But hey, at least we have our debugging and an easier way to deploy to Linux! This is cross platform and can even run on macOS via XCode. CMake is definitely the best way to deploy your C++ programs. You can then deploy it to HPC servers with a simple shell script, and then you can put them into containers and spin them up automatically -- there's a lot of possibilities with a standardized, cross-platform build script.
Thanks for reading, and again here is this tutorial's GitHub repo.
As a spinoff blog to these two, I will be posting a blog about Visual Studio + CUDA next, so stay tuned!