CUDA 10.2, VS2019, and CMake
Introduction
It's a pain to start a new CUDA project in Visual Studio. I've had to edit my .vcproj files to handle CUDA dependencies and IDE settings. Usually, people will just copy the samples and hack them into shape. There is also a huge hole in documentation for this, from both Microsoft and Nvidia. This article isn't about programming in CUDA, but about setting up the programming development on your machine. I'll try to explain some of my solutions and some things I've picked up from trying to create new CUDA VS solutions and projects.
Visual Studio Solutions
This first part is about using the standard VS solutions and projects. Unfortunately it's notoriously buggy since CUDA and VS don't play very well together sometimes.
Hidden CUDA Template
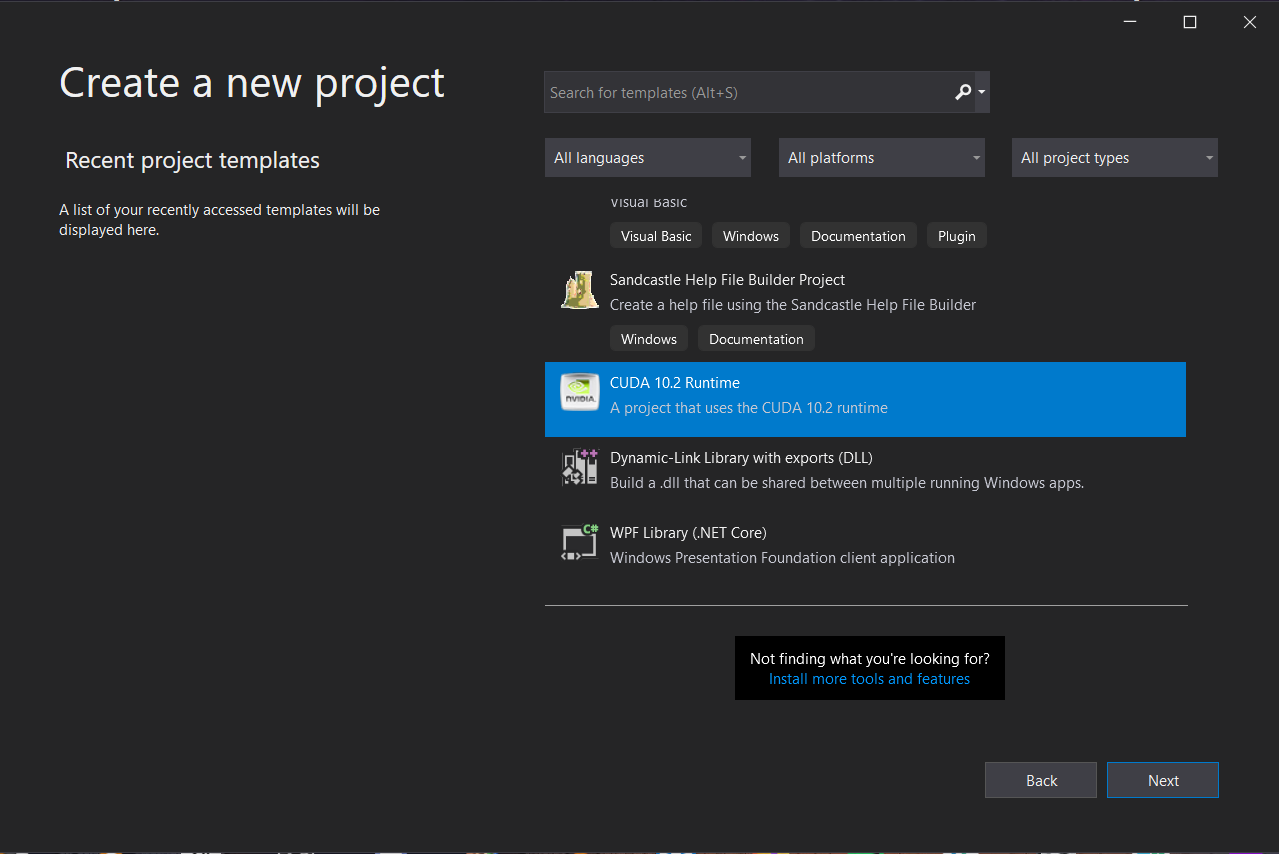
If you open up VS2019, create a new project, and search for "CUDA", you'll see nothing. However, if you have a lot of template suggestions like me, you'll miss that there is a CUDA 10.2 Runtime template at the very bottom.

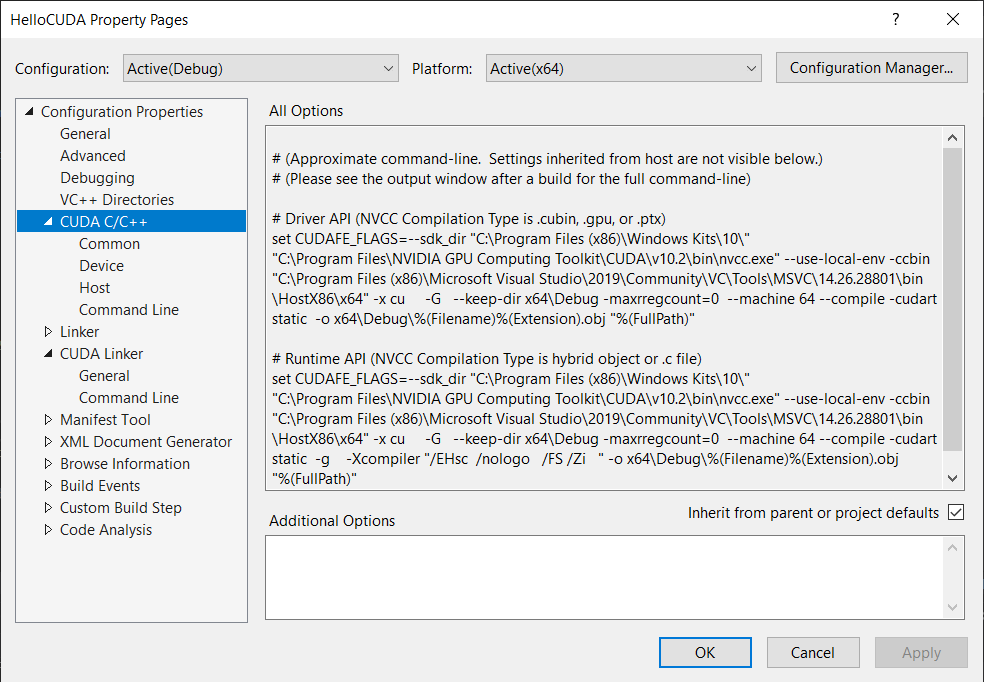
The important part is that this template will create these two new CUDA configuration properties tabs.

Now if you hit play, it will run the default kernel.cu file.
Template Complications
CUDA and Visual Studio haven't been well integrated in the past. If this template works for you, then perfect. However, if you can't find the template, you're not alone. j2inet wrote a short post about copying files from the NVIDIA GPU Computing Toolkit into the Visual Studio build customizations folder.
Something else I've done in the past is manually edit the vcxproj files. The template
inserts two CUDA specific items into the vcxproj file.
<ImportGroup Label="ExtensionSettings">
    <Import Project="$(VCTargetsPath)\BuildCustomizations\CUDA 10.2.props" />
</ImportGroup>
...
<!-- all the build information -->
...
<ImportGroup Label="ExtensionTargets">
    <Import Project="$(VCTargetsPath)\BuildCustomizations\CUDA 10.2.targets" />
</ImportGroup>
All of the standard CUDA header files should be included using this template and these targets.
Notably, the cuda_helper.h is not included since that is a part of the CUDA samples. I
highly recommend using the cuda helper files that are included in the CUDA samples. You can go into
your project properties --> linker --> additional dependencies and include cufft.lib or any other
library you want that's detailed on the CUDA documentaiton.
CMake
Unfortunately there's another complication with using CMake because the standard for CUDA updated and several functions became deprecated. Some new projects will still use the old functions, especially if you need to generate embedded PTX files or other very fine grained controls like with Nvidia OptiX.
CMake Version 3.8+
Nvidia themselves wrote a blog about this here.
Essentially, this is full support for CUDA where the rest of your CMake code stays the same, and you
only have to add project (Project_Name LANGUAGES CUDA CXX) to your project definition.
If you want to add libraries like CUFFT, then you have to make sure you look in the right place.
Here's one of my CMake files of a GPU reverberator.
project (GPU_Reverberator LANGUAGES CUDA CXX)
# Add external libraries
if (WIN32)
    set ( PROJECT_LINK_LIBS libsndfile-1.lib portaudio_x64.lib)
    link_directories(../libsndfile ../portaudio)
    include_directories(../libsndfile ../portaudio)
else (WIN32)
    set(PROJECT_LINK_LIBS sndfile.so)
    link_directories(/usr/lib /usr/lib/x86_64-linux-gnu /usr/local/lib)
    include_directories(/usr/include /usr/local/include)
endif (WIN32)

# Add include directories
include_directories(cuda_helpers ${CMAKE_CUDA_TOOLKIT_INCLUDE_DIRECTORIES})

# Use file(GLOB ...) for wildcard additions:
file(GLOB SOURCES ${CMAKE_CURRENT_SOURCE_DIR}/src/*)

# Add source to this project's executable.
add_executable(gpu_reverberator ${SOURCES})

# Find cufft
find_library(CUDA_CUFFT_LIBRARY cufft PATHS ${CMAKE_CUDA_IMPLICIT_LINK_DIRECTORIES})

# Add to linker
target_link_libraries(gpu_reverberator
    ${PROJECT_LINK_LIBS}
    ${CUDA_CUFFT_LIBRARY}
)CMAKE_CUDA_IMPLICIT_LINK_DIRECTORIES.
This find_library command searches for the string cufft in that specified
path. There is another nicely written blog post here regarding
CMake and CUDA.
Older CMake Versions
This full language support for CUDA only happened in version 3.8. Older versions will use
find_package(CUDA REQUIRED). You still set include directories and libraries the same
way, but you add source files to your compiler using cuda_add_executable(). You can
also directly set nvcc flags. The OptiX 7 tutorial code is a good example of how much you can do using
CMake and CUDA. OptiX requires you to compile your CUDA code into a PTX, embed that PTX into a
string, and put that string into a c file.
This is my CMake file for my Acoustic Raytracing project that utilizes the embedded PTX, from Ingo Wald's tutorial.
find_package(CUDA REQUIRED)
set(CUDA_NVCC_FLAGS ${CUDA_NVCC_FLAGS} -gencode=arch=compute_61,code=sm_61)
include_directories(${OptiX_INCLUDE} ${PROJECT_SOURCE_DIR}/common/cuda_helpers ${SNDFILE_INCLUDE_DIR} ${PORTAUDIO_INCLUDE_DIR})
link_directories(${SNDFILE_INCLUDE_DIR} ${PORTAUDIO_INCLUDE_DIR})
cuda_compile_and_embed(embedded_ptx_code devicePrograms.cu)

cuda_add_executable(Acoustic_Raytracing.out
    audio.cpp
    audio.h
    kernels.cu
    kernels.cuh
    ${embedded_ptx_code}
    optix7.h
    CUDABuffer.h
    debug.cuh
    kernels.cuh
    LaunchParams.h
    main.cpp
    prd.h
    OptixSetup.h
    OptixSetup.cpp
    Bui/Microphone.h
    Bui/Microphone.cpp
    Bui/SoundItem.h
    Bui/SoundItem.cpp
    Bui/SoundSource.h
    Bui/SoundSource.cpp
    Bui/convolve.cu
    Bui/convolve.cuh
    )
target_link_libraries(Acoustic_Raytracing.out
    gdt
    ${optix_LIBRARY}
    ${CUDA_LIBRARIES}
    ${CUDA_CUDA_LIBRARY}
    ${SNDFILE_LIB}
    ${PORTAUDIO_LIB}
    ${CUDA_cufft_LIBRARY}
)cuda_compile_and_embed function if you're not using OptiX.
The find_package command also creates the CUDA library linker variables such as
CUDA_cufft_LIBRARY.
Conclusion
Setting up CUDA can be tricky if you don't know what you're doing. This short post was about the different ways I've setup a CUDA development environment without flat out copying the CUDA samples, which is what I've done in the past. It's also very nice to start from a very minimal example and start off from there.